NOTE: This page contains information on standalone ReadyAPI that has been replaced with ReadyAPI. To try enhanced data-driven testing functionality, feel free to download a ReadyAPI trial from our website.
One of the major time consumers when testing applications is going through lots of different data sets in order to test the functionality of a Web Service. This is easily solved in ReadyAPI with the DataSource TestStep where you can connect to a data source and feed the Web Service with data. Here is a tutorial that describes how to use Microsoft SQL Server as a source these tests. We will even thrown MySQL in for free.
Let us show you how to!
1. Data Driven Testing: Preparation
Using the DataSource TestStep is not that hard in general, but what can be difficult is using the right connection string and how to use the driver itself. Both issues will be explained here. But, let’s start from the beginning.
1.1. Prereqs
In our example we have the following;
- A Microsoft SQL Server database (db_author) instance with one table, tb_author. we'll also see in the end how to do this with MySQL.
- The Amazon.com Web Service
- A settings file containing login data
All these can be gotten by downloading the Tutorial .zip.
1.2. Preparation
- Step 1, The MS SQL Server
If you don’t have an installation of MS SQL, use the download links here or read on, this tutorial is useful for MySQL as well.
- Step 2, The Driver
First we need a JDBC driver, you can get that here .
Then unzip the file and put the driver, named sqljdbc.jar, either in your JAVA HOME/lib/ext or in soapUI/jre/ lib/ (for example C:\Program Files\SmartBear\soapUI-Pro-4.5.1\jre\lib\ext).
If you have soapUI running, restart it so that it can reload all drivers.
- Step 3, The database.
OK, we need a database, so let’s make something simple to illustrate the functionality.
As usual we’ll use the Amazon Web Services to illustrate the functionality.
 We’ll make a database called db_author containing one table called tb_author.
This table contains two fields, one called index and one called author. Like seen here:
That is all we need, let's start soapUI and get testing! : Preparation
All these can be gotten by downloading the Tutorial .zip.
2. Data Driven Testing: Implementation
Now when we have the database set up and a JDBC driver running, let's get going with the Implementation.
2.1. Implementation
Let us first examine what we want to do:
- Get an Amazon User ID from a configuration file
- Retrieve an Author from a MS SQL Database
- Call Amazons ItemSearch with the User ID and Author
- Handle the Response in some way
- Loop until done
All thiz is in the Tutorial .zip.
2.1.1. Step o: Start the project
- First we create a project
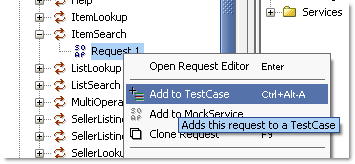 from the URL http://webservices.amazon.com/AWSECommerceService/AWSECommerceService.wsdl. In this we’ll choose the itemSearch request and add this to a TestCase.
- We can then trim the request down to containing what we want.
//
<soapenv:Envelope xmlns:soapennv="http://schemas.xmlsoap.org/soap/envelope/" xmlns:ns="http://webservices.amazon.com/AWSECommerceService/2007-05-14">
<soapenv:Header/>
<soapenv:Body>
<ns:ItemSearch>
<ns:SubscriptionId></ns:SubscriptionId>

<ns:Shared>
<!--Optional:-->
<ns:Author>
 </ns:Author>
<ns:SearchIndex> </ns:SearchIndex>
</ns:Shared>

<!--Zero
 or more repetitions:-->

<ns:Request></ns:Request>

</ns:ItemSearch>
</soapenv:Body>
</soapenv:Envelope> //
2.1.2. Step 1: Get your ID
Now we have to populate the request with data and the first step is populating the element <ns:SubscriptionId></ns:SubscriptionId>. (Note, if you don’t have a subscription ID for Amazon Web Services, get it now). We get the data by using a configuration file containing just one line;
// SubscriptionID=[your ID] //
and retrieving this in a PropertiesStep. We also have a second property, resultCount, which we’ll use later, more about this later, and a Property named type referring to the type of search we’re doing, i.e. books.
2.1.3. Step 2: Connecting to MS SQL
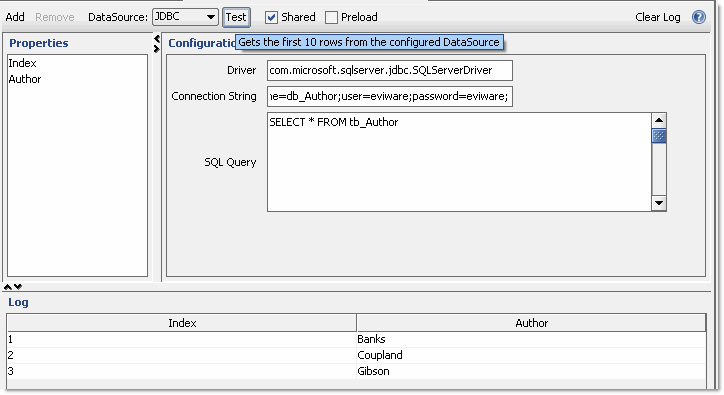
Driver: com.microsoft.sqlserver.jdbc.SQLServerDriver
Connection String: jdbc:sqlserver://localhost:1898;databaseName=db_Author;user=eviware;password=eviware;
SQL Query: SELECT * FROM tb_Author
- Let’s go on to actually populating the request and get to the heart of this tutorial. Let’s add a datasource.
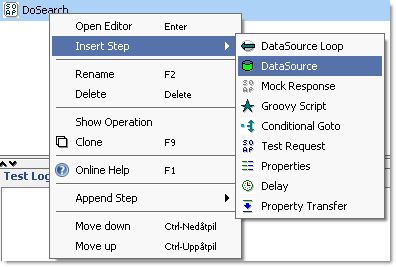
- Then we configure the data source, here are the parameters:
- Please note that you will have to change port, user and password to what you might have in your environment.
- We also will have to add two properties, index and author that corresponds to the SQL Statement. Once done, you can test the entire step.
2.1.4. Step 3: DataTransfer
Now that we have collected the data, let’s transfer it into the request.
Let’s add a PropertyTransfer Step with three transfers, MoveAuthor, MoveMyID, MoveType.We can use the XPath Selector tool to make the transfer a breeze.
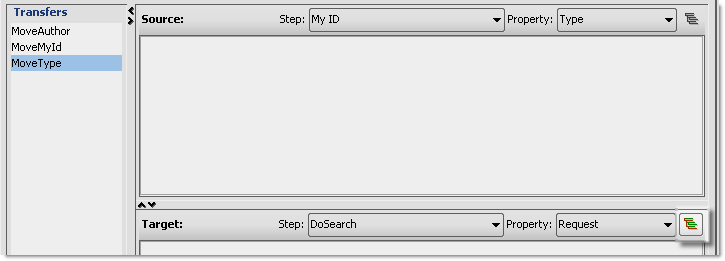
We have made a small movie showing this step. Watch it here (in a new window)
2.1.5. Step 4: Check the test
What we have now should look like this.
- Gotten base parameters
- Gotten Test Data
- Transferred into a search
- The Search Request
like this:

2.1.6. Step 5: Using the result
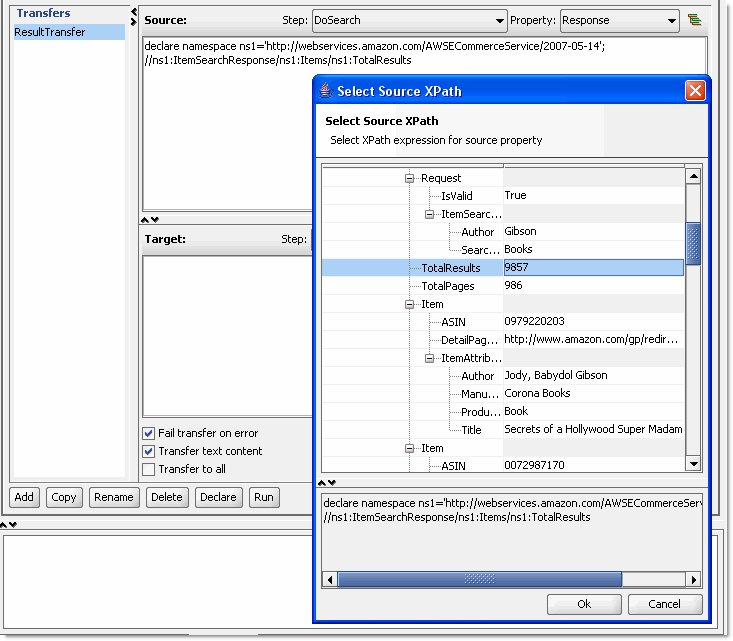
Remember we had a property called resultcount, let’s use it. We make another property transfer step that takes the number of hits from the ItemSearch response and moves it to the property, remember to use the xpath selector. Also remember that you have to run the request in order to be able to use the selector, without a proper request you won’t have a proper response to choose from.
2.1.7. Step 6: A Groovy Step
In order to see that this is working, let’s show a dialog with the result. We add a Groovy script containing the following;
// get target step

def step = testRunner.testCase.getTestStepByName( "My ID" );

def step2 = testRunner.testCase.getTestStepByName( "MySQL Retrieve" );

com.eviware.soapui.support.UISupport.showInfoMessage(

"Got " + step.getPropertyValue( "ResultCount" ) + " hits for author [" +

step2.getPropertyValue( "Author" ) + "]" );
2.1.8. Step 7: Loop it!
Lastly, in order to use all data in the database, we need to finish the test with a DataSourceLoop step.
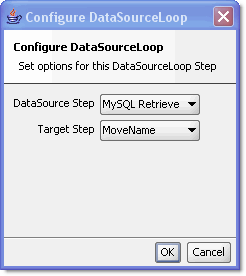
Now we can run the entire test, and should be receiving the following:
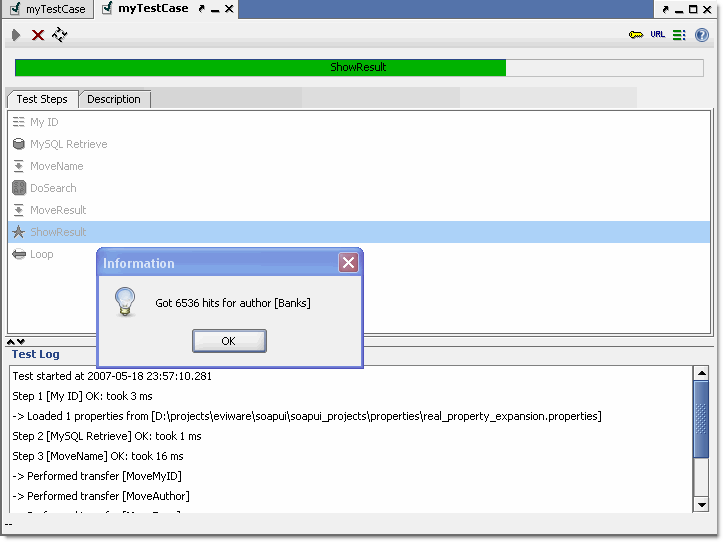
And that is it! You now have a working test! Creating a data driven test in soapUI isn’t harder than that.
But wait! What about MySQL users? Well basically it's the same thing, all you need to do is change the DataSourceStep to the following:
Driver: com.mysql.jdbc.Driver
Connection String: jdbc:mysql://localhost:3306/eviware_demo_datainsert?user=evidemo&password=evipass
SQL Query: SELECT * FROM tb_Author
Both MySQL and MS SQL projects are available to Pro Users.
Project Files and More coming up!
3. What you need to know
The file contains all you need to run the example in the tutorial. You should however read it carefully, remember that you need a Database instance running and that you need to install a JDBC driver.
Also remember that you need to change all the references to the files, since they might not work in your environment
4. Download
This zip file consists of the following files:
- my_id.properties, file for Amazon Subscription ID
- soapUI and SQL Server-soapui-project.xml
Download here: soapui_and_sql_server-soapui-project
5. References
Now when we have the database set up and a JDBC driver running, let's get going with the Implementation.
Implementation
Let us first examine what we want to do:
1. Get an Amazon User ID from a configuration file
2. Retrieve an Author from a MS SQL Database
3. Call Amazons ItemSearch with the User ID and Author
4. Handle the Response in some way
5. Loop until done
All these can be gotten by downloading the Tutorial .zip.