In this guide you'll learn how to add Assertion TestSteps to a TestCase, and run the test. This feature is only available in standalone ReadyAPI that has been superseded by ReadyAPI in the ReadyAPI platform.
To try the new functionality, feel free to download a ReadyAPI trial.
What is a test without a way to verify the results? ReadyAPIvides two methods for asserting tests: assertions for TestSteps and now the Assertion TestStep (PRO version only). The Assertion TestStep expands the idea of assertion handling and management. This feature allows the flexibility of creating simple to complex assertions that can assert any property from project level to individual teststeps within a testcase as well as request/response, JMS, JDBC or Security-related activities. Additionally, assertions can be grouped and leverage the Boolean logic.
1. Getting started
So let's begin creating an Assertion TestStep:
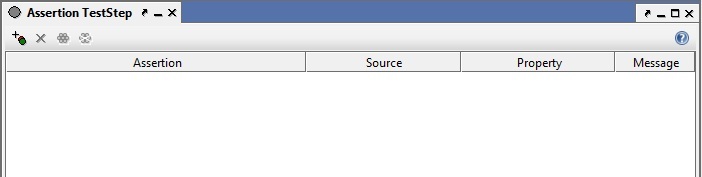
Right click TestCase then choose Add Step -> Assertion TestStep to open the Assertion TestStep window as shown below.
Click the add assertion button  to begin selecting and configuring assertions.
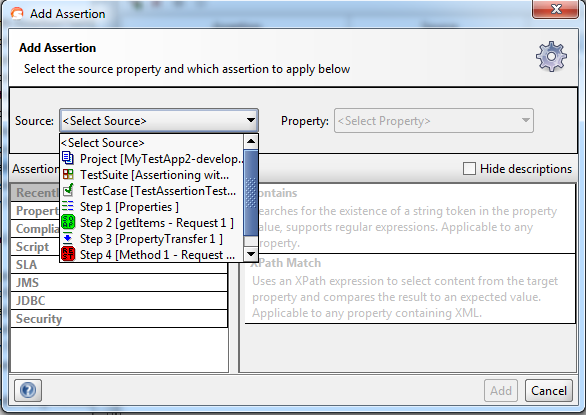
Use the Add Assertion wizard to easily select and configure assertions to be included in the Assertion TestStep. After selecting the Source, the Properties combo box is populated with all the properties for the selected Source. "Missing properties" indicates that the source has no properties which can be asserted. If the selected source is a TestStep, the "Response" property will be preselected. This functionality behaves in the same manner as inside the Assertable TestStep/Assertions inspector. Click this link http://www.soapui.org/Functional-Testing/getting-started-with-assertions.html#1-managing-assertions for more information. If the selected source is the parent item of Assertion TestStep, i.e. Project/TestSuite/TestCase and if it has qualified properties to assert on, then a property can be optionally selected to continue the process of selecting an assertion. Qualified assertions are enabled automatically based on your desired selection of Source and Property.
For more information regarding assertion categories and types please see http://www.soapui.org/Functional-Testing/getting-started-with-assertions.html#2-assertion-categories
2. Grouping Assertions
Once assertions have been created (two or more), they can be grouped as shown below. Grouped assertions can use either an AND or OR logic for more sophisticated assertion management.
AND: All assertions evaluated to VALID will assert a PASSED group condition
OR: At least one assertion within the group must evaluate to VALID to assert a group PASSED condition.
Let’s begin grouping assertions now. In the Assertion TestStep window,
- select two or more assertions by holding the CTRL key and clicking all desired assertions to be grouped
- click the group assertions button
 to open the Group dialog.
NOTE: Assertions can be randomly chosen for grouping. You are not limited to select them contiguously.
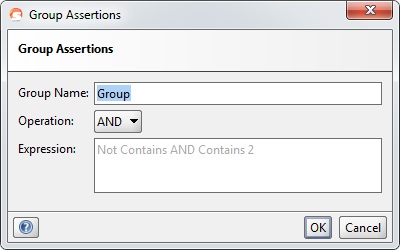
In the Group Assertion dialog enter a (or accept the default) Group Name, choose an Operation, AND or OR,and click OK. This will add a tree view to the Assertion TestStep window. To change the group configuration at any time, right click on a group name and then choose Configure assertion. You can easily rename the group or change the operation.
3. Run TestCase
In the Navigator, double click on the TestCase containing the Assertion TestStep and on the opened corresponding window, click the play button. The TestCase is executed and the assertions contained within the Assertion TestStep are evaluated.
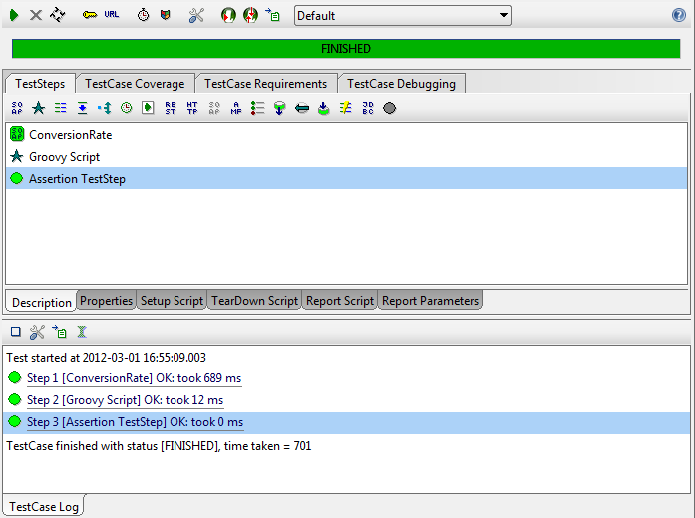
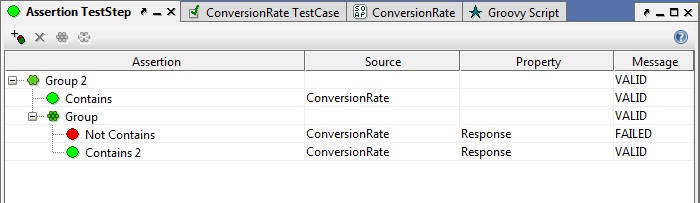
The picture below demonstrates an example of how each assertion, grouped and non-grouped, are evaluated. The failed assertion contained within a group with an OR logic Is evaluated to FAILED but the group itself is VALID.-
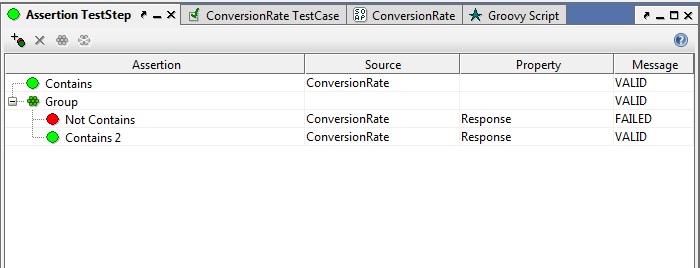
Be adventurous by modifying the group to use the AND logic. Rerun the TestCase and now the picture shows an example of the one failed assertion causing the entire group to have a FAILED message.

Last, grouping allows the flexibility to have nested groups of assertions. To do this,
- Simply expand a group of assertions
- hold CTRL key and click on the desired assertions to subgroup
- Right Click -> Group assertions to create the subgroup.
4. Other Assertion Features
Add Assertion to Group: Select an existing assertion or group and right click -> Add Assertion To Group. The “Add Assertion” wizard opens allowing you to select and configure a new assertion (follow the instructions provided above). If a non-grouped assertion is selected, it will append the assertion to the Top-level group or else it will append it to the selected group.
Clone Assertions: The Clone Assertion dialog allows you to copy an assertion to a different teststep in the same or a different project. The cloned assertion will inherit the assertion’s configuration.
Disable/Enable Assertions: This feature allows any grouped or ungrouped assertion to be disabled or enabled. If the assertion is disabled, it is grayed out and when a TestCase is executed, it is not considered for assertion during a testrun.
Move Assertions: Rlick click on an assertion and then choose Move Assertions. Once the dialog opens, you can choose either Top Level or a group to move a grouped or non-grouped assertion to the selected group.
Remove Assertions: Right click on an assertion then choose Remove Assertion to delete it from the Assertion TestStep.
Rename Assertions/Groups: Right click an assertion or group and choose Rename Assertion to change the name.
Ungroup Assertions: Right click assertion group then choose Ungroup assertions. If the assertions are contained within a subgroup, the assertions are promoted to the next level up of a subgroup or group.
Re-Configure the Assertions: Right click on an assertion then choose Configure or double-click the assertion. This will open the configuration dialog (same as when the assertion was originally added). Please note there are non-configurable assertions where reconfiguration is not available.
5. Changing Source and Property for the Assertion
After you’ve added and configured an Assertion you might want to connect it to a different Source and Property combination. There is a right-click mouse option for this, which opens the following dialog
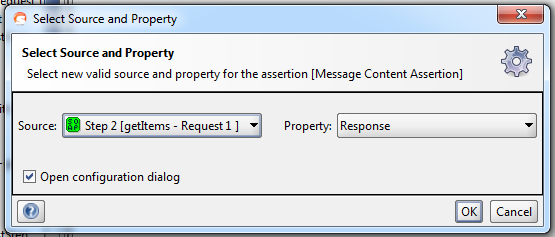
When changing Source and Property, a similar logic is used as when you were adding an Assertion. The difference you will see is this feature will not list items that do not have applicable properties for assertion. "Open configuration dialog" is checked by default. When you click OK, it will open the assertion for configuration. Uncheck it if you wish to retain the original configuration.
6. Side-effects of moving/deleting assertion source and property
If there is an Assertion added for a particular TestStep as a source, and the source TestStep is deleted, all Assertions attached to it will also be deleted. The same thing happens when a property which is being asserted inside AssertionTestStep is deleted. This happens without warning.
Rules on Moving TestSteps
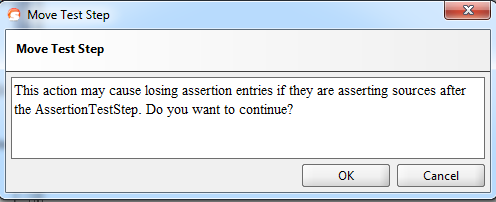
1. If a TestStep is moved after an Assertion TestStep that contains assertions for the moved TestStep, the assertions in question will be removed with a warning prior to deleting them from the Assertion TestStep.
2. If an Assertion TestStep is moved up before a TestStep for which it contains assertions, the assertions in question will be deleted, with a warning, from the Assertion TestStep.
back to top.
Try ReadyAPI in ReadyAPI for free
Data driven testing is a Pro specific feature. By going Pro you get everything thats in SoapUI plus a bunch of productivity and time-saving enhancements. Download our 2-week free trial and try them out for yourself!