NOTE: This page contains information on standalone SoapUI Pro that has been replaced with ReadyAPI. To try WSDL refactoring functionality, feel free to download a ReadyAPI trial from our website.
When updating a WSDL, the underlying contract changes may require changes to all messages related to a certain modification, for example if an element has been renamed or moved. Also, XPath expressions in assertions, property transfers and expansions, etc. may need to be updated to correctly reference updated elements.
The WSDL Refactoring feature in ReadyAPI aims at greatly easing this update process by providing a wizard allowing you to map old message elements to new ones, resulting in automatically updated message content and xpath expressions. You always have the possibility to manually override or discard those changes created by SoapUI during the process, ensuring that the correct result comes out in the end.
Getting Started with WSDL Refactoring
When you have a situation where the WSDL has updated, right-click on the WSDL interface node and select "Refactor Definition". You will see Refactor definition window open., which will open the following dialog:
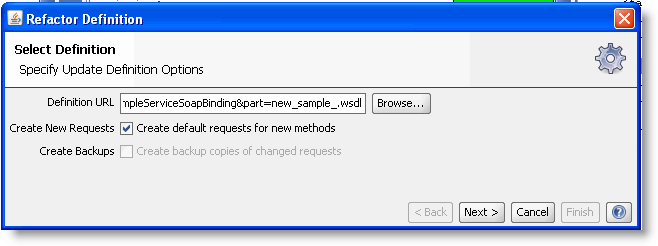
Specify the Definition URL for the updated WSDL and if you want to create new requests and backup copies for all modified requests.
Refactor Operations
Selecting Next will load and analyze the new WSDL and start the refactoring process by prompting for how to map old operations to new ones (if required)
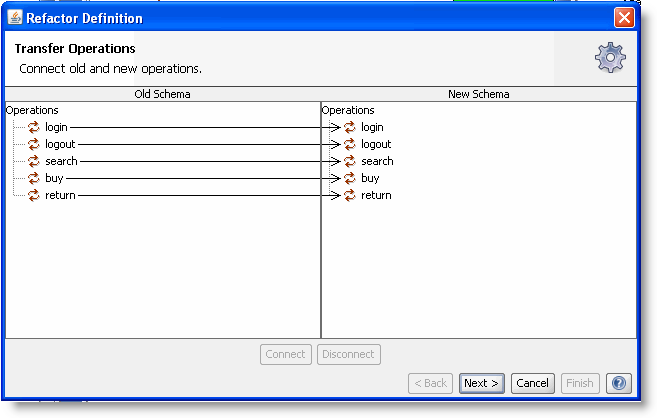
Operations that are not automatically matched (based on their names) are displayed as red; associate these with their new counterparts (if available) by either dragging them onto the new operation or by selecting both and pressing the "Connect" button. If two operations have been incorrectly associated, select them both and press the "Disconnect" button instead.
Message Refactoring
Press Next to move on the message refactoring:

This is the main refactoring step, the window is laid out as follows:
- The panel to the left contains a familiar tree view of the updated interface, each operation containing nodes for all corresponding requests and mockresponse in the project.
- The top right section contains two trees displaying the message structure of the old schema definition and the new one for the currently selected operation in the tree to the left. Here you can map old elements/attributes to new ones by either dragging or selecting and connecting them manually with the connect option.
- The bottom right section contains the old request (to the left) and the request as it would be updated (to the right) by the current mappings in the top right section. If the updates are not in line with your requirements, select the "Edit Manually" button and manually adjust the message (Please note that unselecting the Edit Manually checkbox will leave the message in its last edited state without attempting to make any automatic updates).
Changing namespace, reordering elements and changing an element to an attribute or vice versa are refactored automatically and can be reviewed in the top section. Renaming elements and attributes can be mapped manually in the top section. More complex structural changes are currently not handled, but each request and response needs to be edited manually in the bottom section.
Red nodes in the left-hand tree indicates messages that could not be refactored automatically, either because the old schema could not be mapped directly to the new schema, or because old messages did not match their old schema. These messages need to be edited manually.
Red nodes in the Old Schema tree indicate elements or attributes in the old schema that are missing in the new schema. Please review the requests or mockresponses and review those values.
Blue nodes in the New Schema tree indicate elements or attributes in the new schema that did not exist in the old schema. This is a help to find schema changes.
The Filter checkbox can be selected to hide the nodes that were not changed and focus on the changes.
Updating Test XPath
When all operations and their messages have been resolved, move forward to the next step with the Next button
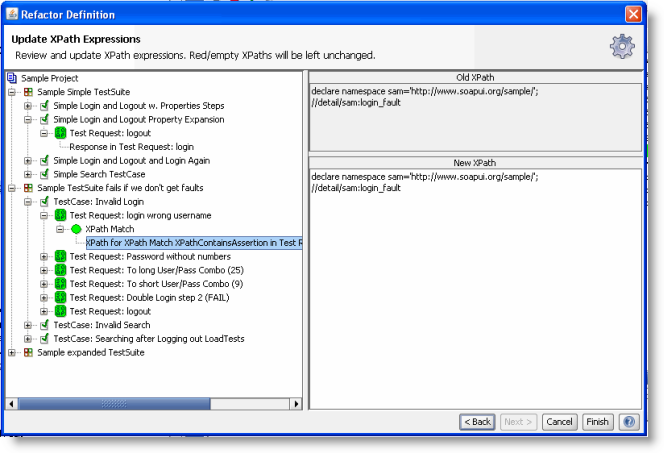
This step prompts you to review all XPath expressions in your project to see if they have been updated correctly. The tree to the left shows all items in the project containing XPath-expressions (assertions, property transfers, etc.). Selecting an XPath in the tree will show its old and new values in the two panels to the right. The New XPath expression can be modified manually if desired
If the XPath could not be refactored automatically (because it was invalid or because the schema changes were too complex), it will be red in the left hand tree, and the New XPath text will be empty. Please edit the New XPath manually. If this field is left empty, the XPath will be left unmodified.
Select Finish when ready and SoapUI will process your project as configured and update all messages and XPath expressions accordingly.