NOTE: Some of the scripts in this section relate to standalone SoapUI Pro, which is now part of the ReadyAPI application suite. To try the new functionality, feel free to download the trial version of ReadyAPI from our web site.
Accessing Properties
1.1 Get and Set Properties
All objects that contain properties have the getPropertyValue and setPropertyValue methods. So, you can easily get and set properties from test items by using the Groovy Script test step.
// Get a test case property
def testCaseProperty = testRunner.testCase.getPropertyValue("MyProp")
// Get a test suite property
def testSuiteProperty = testRunner.testCase.testSuite.getPropertyValue( "MyProp" )
// Get a project property
def projectProperty = testRunner.testCase.testSuite.project.getPropertyValue( "MyProp" )
// Get a global property
def globalProperty = com.eviware.soapui.SoapUI.globalProperties.getPropertyValue( "MyProp" )

// Set a test case property
testRunner.testCase.setPropertyValue( "MyProp", someValue )
// Set a test suite property
testRunner.testCase.testSuite.setPropertyValue( "MyProp", someValue )
// Set a project property
testRunner.testCase.testSuite.project.setPropertyValue( "MyProp", someValue )
// Set a global property
com.eviware.soapui.SoapUI.globalProperties.setPropertyValue( "MyProp", someValue )
As the testRunner object is not available in the Script assertion, you must use another approach to get test case, test suite or project properties:
// Get a test case property
def testCaseProperty = messageExchange.modelItem.testStep.testCase.getPropertyValue( "MyProp" )
// Get a test suite property
def testSuiteProperty = messageExchange.modelItem.testStep.testCase.testSuite.getPropertyValue( "MyProp" )
// Get a project property
def projectProperty = messageExchange.modelItem.testStep.testCase.testSuite.project.getPropertyValue( "MyProp" )
// Get a global property
def globalProperty = com.eviware.soapui.SoapUI.globalProperties.getPropertyValue( "MyProp" )
1.2 Get and Set SoapUI Preferences
SopaUI settings are stored in interfaces of the soapui.settings package. To set an option, pass the corresponding constant and the desired value to the SoapUI.settings.setString method. For example, the following script sets an SSL keystore and password programmatically:
import com.eviware.soapui.settings.SSLSettings
import com.eviware.soapui.SoapUI

SoapUI.settings.setString( SSLSettings.KEYSTORE, pathToKeystore )
SoapUI.settings.setString( SSLSettings.KEYSTORE_PASSWORD, keystorePassword )
To obtain the value of an option, pass the corresponding constant to the SoapUI.settings.getString method. The second argument of the method takes the value to return if the option is not set. For example, the following script returns the current value of the SSL Keystore option. If the option is empty, the corresponding string will be returned.
import com.eviware.soapui.settings.SSLSettings
import com.eviware.soapui.SoapUI

SoapUI.settings.getString( SSLSettings.KEYSTORE, “The value is empty” )
There are several ways to run this script:
-
As a Groovy Script test step.
-
As a Setup or TearDown script on the project, test suite, or test case level in SoapUI.
1.3 Get the Project Name
To get the project name, use the following script in the Groovy Script test step:
testRunner.testCase.testSuite.project.name
1.4 Get the Test Step Name
To get the name of the test step that is being executed:
context.getCurrentStep().getLabel()
Dynamic Property Expansions
2.1 Conditional Inline Property Expansion
It is possible to use conditional property expansions. For example, you can get the value of one of two custom properties based on the value of a third custom property. The following property expansion returns the value of the FirstXML test case property if the selection test case property equals “first”. Otherwise, the property expansion returns the value of the SecondXML test case property.
${= testCase.getPropertyValue( "selection" ) == "first" ? testCase.getPropertyValue( "FirstXML" ) : testCase.getPropertyValue( "SecondXML" )}
2.2 Generate a Universally Unique Identifier
The following property expansion returns a random universally unique identifier:
${=java.util.UUID.randomUUID()}
DataSources and DataSinks
3.1 Implementing Groovy DataSources
The example below is a sample Groovy DataSource test step. The script iterates through the files in the specified directory and returns the files’ contents:
// To get the output value, use the built-in result map object
def groovyUtils = new com.eviware.soapui.support.GroovyUtils(context)
def projectPath = groovyUtils.projectPath
def directoryName = projectPath + "/testData"
def row = testRunner.testCase.testSteps["DataSource"].currentRow
def allFiles = []
new File( directoryName ).eachFile() { file ->
    if( file.name =~ /.txt/ ) {
        allFiles.add( file.name )	}
}
if ( (row + 1) <= allFiles.size ) {
    // Output to the test step property called inputData
    result["inputData"] = new File( directoryName + "/" + allFiles[row] ).text
}
3.2 Implementing Groovy DataSink
The script below demonstrates how to work with the Groovy DataSink test step:
// Write the response from the "Test Request: login" test step to a file
def currentUser = context.expand( '${#TestCase#currentUser}' )
def response = context.expand( '${Test Request: login#Response}' )
new File( "C:/Users/eviware/" + currentUser + "_response.txt" ).write( response )

// To use another charset instead of the default one, do the following:
// new File( "C:/Users/eviware/" + currentUser + "_response.txt" ).write( response, "UTF-8" )
3.3 Combining Multiple DataSource Values
The following script gets the values from a project and a data source, combines them to a single string and writes them to the test case custom property.
// Get values from a data source
def countryCode = context.expand( '${DataSource#CountryCode}' )
def countryName = context.expand( '${DataSource#CountryName}' )

// Get the project's XmlFragment property
def frag = context.expand( '${#Project#XmlFragment}' )

// Combine the text of all properties
def newPropertyValue = frag + countryCode + countryName

// Write the resulting text to the test case property
testRunner.testCase.setPropertyValue( 'ResultingText', newPropertyValue )
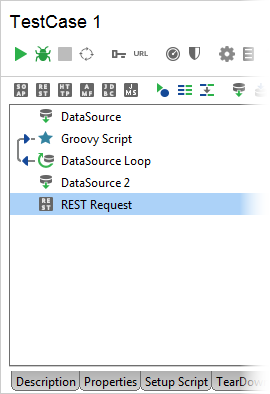
3.4 Randomizing DataSource Rows
Most data sources return values in sequence. You can use groovy scripts to randomize the order of the returned values each time you run a test. Here is how you organize your test to do this:
-
The original DataSource test step with the data you want to randomize.
-
The Groovy Script test step that creates a list with the data from the data source. Use the following script:
// Create a list if necessary
// If your data source returns multiple properties, create a list for each property you need
if( context["allRows"] == null ) context["allRows"] = []

// Append the current data source row value to the list
context["allRows"] << context.expand( '${DataSource#outputProperty}' )
-
The DataSource Loop test step that iterates through the original data source so that you can get all the data it returns.
-
The Groovy DataSource test step that provides random data to your test. Use the following script:
// Shuffle the list before returning values
// Use a separate Groovy Script test step if you do not want to shuffle the list at each iteration
Collections.shuffle( context["allRows"] )

// Get the value of the current row
def row = testRunner.testCase.testSteps["DataSource 2"].currentRow

// Return the value as long as it is within the list
if ( row + 1 <= context["allRows"].size() )
{
    result["randomRow"] = context["allRows"][row]
}
-
Your test steps that use the data and optionally a data source loop to iterate through it.
Here is what your test case can look like:
Working With XML
4.1 Iterate Nodes
Use the GroovyUtils class to create an instance of the XmlHolder object. This object allows you to iterate through XML nodes:
// Create the XmlHolder object for the response of the Request 1 request
def groovyUtils = new com.eviware.soapui.support.GroovyUtils( context )
def holder = groovyUtils.getXmlHolder( "Request 1#Response" )

// Iterate through item nodes in the response message
for( item in holder.getNodeValues( "//item" ))
    log.info "Item : [$item]"
If the desired node belongs to a namespace, you need to define the namespace first:
// Create the XmlHolder object for the response of the Request 1 request
def groovyUtils = new com.eviware.soapui.support.GroovyUtils( context )
def holder = groovyUtils.getXmlHolder( "Request 1#Response" )

// Define a namespace
holder.namespaces["ns"] = "http://acme.com/mynamspace"

// Iterate through item nodes in the response message
for( item in holder.getNodeValues( "//ns:item" ))
    log.info "Item : [$item]"
You can run these scripts as a Groovy Script test step.
4.2 Count Nodes
Using the XmlHolder object of the GroovyUtils class, you can count specific nodes:
// Create the XmlHolder object for the response of the Request 1 request
def groovyUtils = new com.eviware.soapui.support.GroovyUtils( context )
def holder = groovyUtils.getXmlHolder( "Request 1#Response" )

// Obtain the number of links in paragraphs
def numberOfLinksInParagraphs = holder["count(//html/body/p/a)"]
You can run this script as a Groovy Script test step.
4.3 Change XML Content of a Request From Groovy
To change the content of an XML node, assign the desired value by using the XmlHolder object with the corresponding XPath expression. After that, you need to use the updateProperty method to save the specified value. The following example sets a password inside a request SOAP message:
// Create the XmlHolder object for the login request
def groovyUtils = new com.eviware.soapui.support.GroovyUtils( context )
def holder = groovyUtils.getXmlHolder( "login#Request" )

// Change the value of the password node
holder["//password"] = "new value"

// Write the updated request
holder.updateProperty()
You can run this script as a Groovy Script test step.
4.4 Validate a Request's XML Data Against a WSDL Definition
To validate a request against the project’s WSDL definition, use the following script assertion:
// Obtain an interface’s WSDL definition
def project = messageExchange.modelItem.testStep.testCase.testSuite.project
def wsdlcontext = project.getInterfaceAt(0).getDefinitionContext()

// Create a validator object
def validator = new com.eviware.soapui.impl.wsdl.support.wsdl.WsdlValidator(wsdlcontext);

// Validate a request
def errors = validator.assertRequest(messageExchange, false)
for( error in errors )
    assert false
4.5 Remove Empty XML Elements From a Request
You can already remove empty XML nodes by using the Remove Empty Content option:
However, it only removes empty end nodes, and can leave empty parent nodes. To remove those, use the following script:
// Create groovyUtils and XmlHolder for the request of the Sample Request test step.
def groovyUtils = new com.eviware.soapui.support.GroovyUtils( context )
def holder = groovyUtils.getXmlHolder( 'Test Request - login#Request' )

// Find nodes that consist of only whitespaces.
for( item in holder.getDomNodes( "//*[normalize-space(.) = '' and count(*) = 0]" )){
    item.removeXobj()
}
// Update the request and write the updated request back to the test step.
holder.updateProperty()
context.requestContent = holder.xml
Working With Events
5.1 Changing a Response Before It Gets Validated
If you want to change all the occurrences of a string in a response, use the RequestFilter.afterRequest event handler. The script below replaces all the occurrences of 555 with 444 in all response messages:
// Get the response content
if( request.response == null )
    return

def content = context.httpResponse.responseContent

// Replace the string
content = content.replaceAll( "555", "444" )

// Write the new content to the response
context.httpResponse.responseContent = content
The subsequent assertions will use the updated response for validation.
The following code demonstrates how you can add a custom HTTP header to requests from within the RequestFilter.filterRequest event handler:
// Get the request headers
def headers = request.requestHeaders

// Remove an existing header
headers.remove("X-tokenHeader")

// Create a custom header
headers.put( "X-tokenHeader", "value") // Replace values with those you need

// Add the custom header to request headers
request.requestHeaders = headers
Controlling Playback
6.1 Loop a Number of Test Steps
The easiest way to create a simple loop is placing a Groovy Script test step after the last test step in the loop. The script must contain the following:
// Create a loop counter
if( context.loopIndex == null )
    context.loopIndex = 0

// Increase the counter value and check if it has reached the desired number
if( ++context.loopIndex < 10 )
{
    // Run the first test step in the loop
    testRunner.gotoStepByName( "First test step" )
}
6.2 Run a Test Case Located in Another Project
The following code demonstrates how you can run a test step from another project of your choice using the built-in scripting objects of SoapUI:
// Replace the project, test suite, case and step names with those you need

// Connect to the test step in another project
def prj = testRunner.testCase.testSuite.project.workspace.getProjectByName("ProjectName")
tCase = prj.testSuites['TestSuiteName'].testCases['TestCaseName']
tStep = tCase.getTestStepByName("TestStepName")

// Call the test runner and check if it can run the specified step
def runner = tStep.run(testRunner, context)
log.info ("runner status ....... : " + runner.hasResponse())
You can run this script as a Groovy Script test step.
SoupUI Open Source
- Create basic test scenarios with assertions.
- Quickly build code-less assertions (no need to use Groovy scripting).
- Create advanced assertions using logic such as "contains", "matches" and more.
SoupUI Pro
- Create basic test scenarios with assertions.
- Quickly build code-less assertions (no need to use Groovy scripting).
- Create advanced assertions using logic such as "contains", "matches" and more.
Working With Mock Services
7.1 Start and Stop Mock Services
The script below runs the specified mock service. If you want to start mock services when your project is opened, use this code in the Load script of your project.
// Get the number of mock services in the project
mockServicesCount = project.getMockServiceCount()
for (i in 0..(mockServicesCount-1))
{
    // Run each mock service
    project.getMockServiceAt(i).start();
    i++;
}
If you want to start a mock service in your functional test, use this code in the Setup script of a test case or test suite.
// Run a mock service
def runner = testCase.testSuite.project.mockServices["My MockService"].start()

// Add the runner object to the context to use it later
context.mockRunner = runner
The object returned by the start method is required to stop the mock service. Save it to the context and use it in the TearDown script:
// Stop the mock service
context.mockRunner.stop()
Have a look at the WsdlMockService and the WsdlMockRunner classes for more methods and properties that might come in handy.
7.2 Simulate a Delay for Mock Service Responses
NOTE: Event handlers are available only in standalone SoapUI Pro, which is now part of the ReadyAPI application suite. To try this functionality, feel free to download the trial version of ReadyAPI from our web site.
To simulate a delay between 0 and 10 seconds in the SOAP service response, add the MockRunListener.onMockResult event at the project level with the following code:
sleep(new Random().nextInt(10) * 1000)
Note: This method only works for SOAP virtual services.
Logging Results
8.1 Saving All Test Step Results to Files
NOTE: Event handlers are available only in standalone SoapUI Pro, which is now part of the ReadyAPI application suite. To try this functionality, feel free to download the trial version of ReadyAPI from our web site.
The following code demonstrates how to save the results of every test step in a project with the TestRunListener.afterStep event handler:
// Replace the path with the one you need
filePath = 'c:/work/test-results/'

// Create output files
fos = new FileOutputStream( filePath + testStepResult.testStep.label + '.txt', true )

// Fill output files
pw = new PrintWriter( fos )
testStepResult.writeTo( pw )

// Close the output stream
pw.close()
fos.close()
8.2 Logging the Result Messages of All Test Steps in All Failed Test Cases
The sample test suite TearDown script below demonstrates how to log the results of all test steps in failed test cases:
for ( testCaseResult in runner.results )
{
    // Get all test case names from the suite
    testCaseName = testCaseResult.getTestCase().name
    log.info testCaseName

    // Check whether the test case has failed
    if ( testCaseResult.getStatus().toString() == 'FAILED' )
    {
        // Log the resulting messages of the failed test cases and test steps
        log.info "$testCaseName has failed"
        for ( testStepResult in testCaseResult.getResults() )
        {
            testStepResult.messages.each() { msg -> log.info msg }
        }
    }
}
Thanks to Finan for this one!
Miscellaneous
The example below demonstrates how you can set a JMS header:
// Get a JMS test step
def myTestStep = testRunner.testCase.getTestStepByName("JMS Test Step")
// Set a message ID
def msgID = "foo4711"
// Set the JMSCorrelationID JMS header
myTestStep.testRequest.JMSHeaderConfig.messageSelector = "JMSCorrelationID = '${msgID}'"
You can run this script as a Groovy Script test step.
9.2 Determine Whether a Test Case is Run From The Command Line or as a Load Test
The following script code determines whether a test is run from the command line or as a load test:
// Check if the test case is run from the command line
if( com.eviware.soapui.SoapUI.isCommandLine() )
{
   log.info "This code is executed by Command Line SoapUI"
}

// Check if the test case is run as a load test
if( context.LoadTestContext != null )
{
   log.info "This code is executed from a LoadTest"
}
You can run these scripts as a Groovy Script test step.
9.3 Use a JDBC Driver From Inside a Groovy Script
If you want to perform direct JDBC calls from a Groovy script, you first need to register the driver. The following script shows how you can do that:
// Register the MySQL JDBC driver
com.eviware.soapui.support.GroovyUtils.registerJdbcDriver( "com.mysql.jdbc.Driver" )
Note: Before registering the driver, you need to place its JAR file in the <SoapUI Installation>\bin\ext directory.
9.4 Access SOAP Operations / REST Resource
The following example demonstrates how you can get SOAP operations:
import com.eviware.soapui.impl.wsdl.WsdlInterface
// Get an interface
myInterface = (WsdlInterface) testRunner.testCase.testSuite.project.getInterfaceByName("SampleServiceSoapBinding")
// Get an operation
myOperation = myInterface.getOperationByName("login")
// Get a request
myRequest = myOperation.getRequestByName("Request 1")
9.5 Encode Attachments With Base64 Encoding
The following code demonstrates how to encode a specific file with Base64:
// Replace the file path with the one you need

// Get the file content
def inputFile = new File("C:\\Work\\MyFile.txt").getText('UTF-8')

// Encode the file content
String encoded = inputFile.bytes.encodeBase64().toString()

// Output the results
log.info encoded // with the Groovy Script test step, you can use “return encoded”