Some of test steps in this article relate to standalone ReadyAPI that has been replaced with ReadyAPI.
To try the new functionality, feel free to download a ReadyAPI trial.
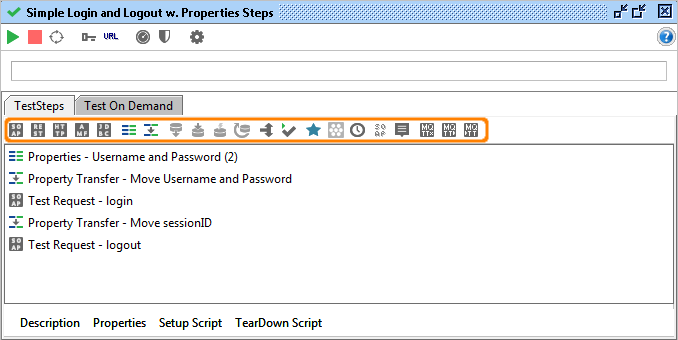
As mentioned previously, TestSteps are the core building blocks of functional tests in soapUI; each TestStep performs some step for validating the functionality to be tested. TestSteps are by default executed sequentially, but several possibilities exist for branching, looping and even calling other TestCases, making complex testing possible when required. Any number of TestSteps can be added to a TestCase; add them by either right clicking in the TestStep list and selecting add/insert or by pressing the corresponding TestStep button in the TestCase window:
When selecting a TestStep, its right-click menu exposes corresponding actions and the bottom left properties table shows related properties that can be set, as for example shown below for a SOAP Request TestStep:
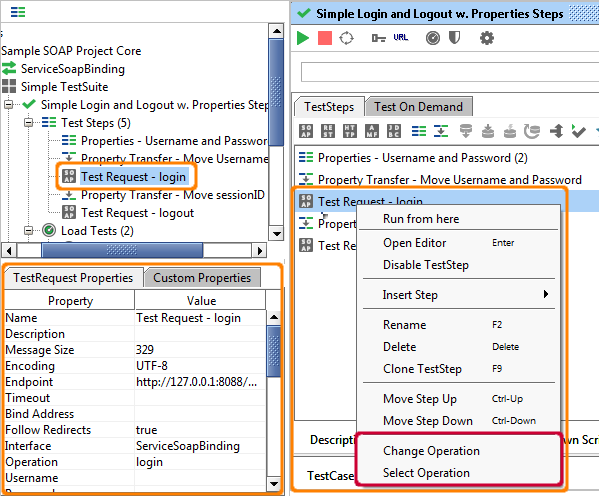
The actions marked in green are specific for the selected TestStep, the others are common for all TestSteps.
So, let's have a look at the different types of TestSteps available followed by a couple of example TestCases so you can get a feeling for what is possible!
Sampler TestSteps
These are the main TestSteps for validating the functionality of your services. They are primarily used to either send or receive messages, which can then be validate via an standard assertion mechanism (described in Validating Messages). The actual content of messages that have been received by a sampler can further be used in several other ways:
- As source for property-transfers, allowing you transfer part(s) of a message to some other message (for example a session-id in a response to a following request) or property.
- For advanced processing and validation in a following script TestStep
- As the source for a DataSource TestStep using the XML DataSource, allowing you to use the result of one request to drive the following TestSteps
- etc.
Currently the following sampler TestSteps are available:
- SOAP Request - sends a SOAP Request over either HTTP, HTTPS or JMS and receives the response if there is one. SOAP Request TestSteps are tied to a corresponding WSDL Operation and its WSDL Interface added to a project when importing its WSDL.
- REST Request - sends a REST request over HTTP, HTTPS or JMS and receives the response if there is one. REST Request TestSteps are tied to a corresponding REST Service, Resource and Method in the containing ReadyAPIject.
- JDBC Request - sends a database query or stored procedure call to the configured database and returns the result as an XML string
- AMF Request - sends an AMF request over HTTP or HTTPS and returns the result as an XML String
- HTTP Request - sends an arbitrary HTTP Request over HTTP, HTTPS or JMS and returns the results as an XML String
- MockResponse - listens and waits for an HTTP or HTTPS request and returns a configured response; used for testing of callbacks and asynchronous processes.
You can combine as many samplers as you want in a TestCase and easily share data between them, for example you might log on to a service using a standard HTTP Request, then use the retrieved HTTP Session in following SOAP Requests and the finally validate the resulting content of a database with the JDBC Teststep.
Property-related TestSteps
Property TestSteps manage properties that are commonly used to parameterize the logic and execution of a TestCase. The TestSteps are:
- Properties - allows you to define an arbitrary number of properties that can optionally be read from or written to a file. These can then be used for parameterization of requests, assertions, etc.
- Property Transfer - allows you to transfer or extract property values between TestSteps, for example you can extract a value from a response message and write it to a DataSink TestStep (see below) for external storage.
- DataGen (ReadyAPI) - allows you to create dynamic properties for creating counters, random property values, etc.
Data-related TestSteps
ReadyAPI adds a number of TestSteps used for interacting with external DataSources, both for reading and writing. These are:
- DataSource - allows you to read property-values from a variety of external sources (Databases, Excel files, directories, etc), which can then for example be used to populate requests (via a property-transfer), validate responses or serve as input for nested DataSources.
- DataSource Loop - pairs up with the DataSource TestStep to allow for iterating over a sequence of TestSteps that should be executed for each row of values available in the DataSource. In soapUI this forms the basis of data-driven testing.
- DataSink - allows you to write property-values to a number of external storages (Databases, Excel, etc) for later analysis or processing.
Execution Flow TestSteps
Although the initial flow of TestStep execution in a TestCase is sequential, there are a number of TestSteps that allow you to do branching, looping, etc:
- Conditional Goto - Checks for specific values in the most previously received message in the TestCase and jumps to a correspondingly configured target TestStep.
- Delay - Pauses the execution of the TestCase for the configured number of milliseconds.
- Run TestCase - transfers execution of the TestCase to the specified target TestCase, setting properties on this TestCase as configured. This allows for powerful modularization of TestCases, which can be useful when for example the same sequence of TestSteps should be run in the beginning of a number of TestCases.
- DataSource Loop - as mentioned above, for iterating over a sequence of TestSteps for each row in the configured DataSource.
Miscellanous
There is one more TestStep that does anything you want it to;
- Script TestStep - holds an arbitrary script (written in either Groovy or JavaScript) that can do almost anything that might be necessary. Common usages are:
- Complex validations of messages not possible with default assertion mechanisms.
- Complex looping or branching.
- Modification of the underlying TestCase (for example dynamic generation of TestSteps from a Database) for advanced DataDriven scenarios.
- Integration with external systems for reading or writing data.
- Triggering of external actions or processes, for example sending email or starting other programs.
- Interacting with the user (dialogs, prompts, etc) for getting input or controlling execution.
- etc.
In conjunction with the Script Library in ReadyAPI, this makes for a very powerful foundation for all your tests, as most anything can be achieved for validating the functionality of your target service(s).
Common Actions and Settings
All TestSteps have a number of actions available from their right-click menu. Some of these are TestStep specific and some common for all TestSteps:
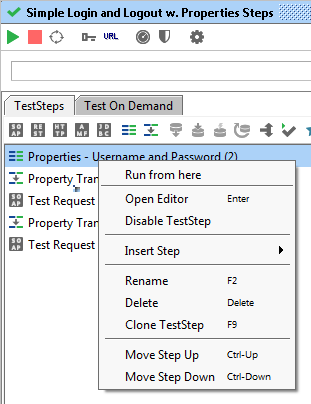
(This popup is for a Properties TestStep which has only common actions and no specific ones)
- Run from here - starts execution of the TestCase from the selected TestStep, useful for debugging purposes.
- Open Editor - opens the corresponding editor window for the TestStep (can also be achieved by double-clicking the TestStep).
- Enable or Disable - TestSteps can be enabled or disabled, allowing you to selectively work with different TestSteps.
- Disabled TestSteps are grayed out in the Navigator to the left and the list of TestSteps.
- Insert Step - Inserts a new TestStep at the position of the selected TestStep (as opposed to the toolbar at the top which appends to the TestCase).
- Rename and Delete - prompts to rename or delete the TestStep. TestCase names must be unique in the TestCase.
- Move or Clone to other TestCases - TestSteps can be cloned or moved to other TestCases in the current Workspace. If the target TestCase is not in the same Project as the current one, you will need to clone depending interfaces (REST or SOAP) as well if such TestSteps are selected and their corresponding interface is not available in the target project.
- Move up or down - They can be moved up or down in the list of TestSteps, which will naturally change the order of TestStep execution when the TestCase is run.
(Both move-related actions can be achieved with standard drag-and-drop actions in the user interface)
Selecting multiple TestSteps and right clicking allows for deletion, enabling and disabling of all the selected steps.
Sample TestCase - Simple login and logout
Let's have a look at the first TestCase in the sample ReadyAPIject included with soapUI, the "Simple Login and Logout w. Properties Steps" TestCase:
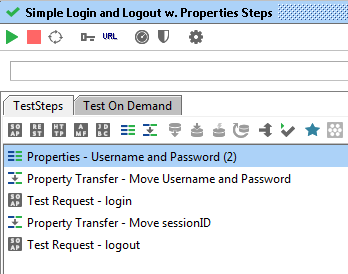
This TestCase is used to validate the login and logout process of our target service, the TestSteps are as follows:
- "Properties: Username and Password" - Defines the Properties that are used in the TestCase for parameterizing the login request. Putting them here makes them easy to change and read from an external file if desired.
- "Property Transfer: Move Username and Password" - Transfers the username and password in the Properties step to the content of the login request so they are used accordingly
- "Test Request: login" - submits the actual login request to the target service and checks the response for errors.
- "Property Transfer: Move sessionID" - transfers the received sessionId from the response of the login request to the following logout request, so we can see that the created session can be terminated as expected.
- "Test Request: logout" - submits the logout request with sessionId received from the login in (3), the response is again validated to contain the expected message and not any errors.
This is a very straightforward TestCase which illustrates some of the key concepts when building TestCases:
- Parameterization is achieved with the initial Properties TestStep.
- Properties are transferred both between messages and from the initial properties using Property Transfer TestSteps.
- Standard SOAP Request TestSteps are used to call and validate the target service.
Now let's have a look at a little more complicated scenario.
Sample TestCase - DataDriven Testing with user Interaction
This is taken from the pro-specific sample project included with ReadyAPI, it looks as follows:
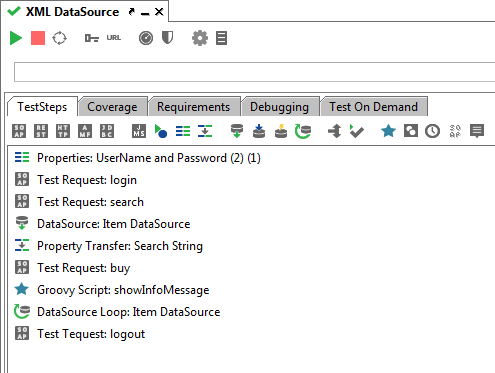
The goal of the TestCase is to login, do a search in a product database and add the found items to an imaginary shopping cart. The TestSteps are:
- "Properties: Username and Password" - as above, defines the username and password properties to be used in the TestCase instead of hard-coding them into the request
- "Test Request: login" - sends a login request to the target service and validates the result to be a valid response. As you can see we did not use a Property Transfer TestStep this time to transfer the username and password properties to the request, instead the request used "Property Expansion", which is a simplified way to transfer property-values suitable for single-value transfers like this one.
- "Test Request: search" - performs a search in the target service using the sessionId received in the response to the previous login request. Once again Property Expansion is used to transfer the sessionId value from the login response (instead of a Property Transfer TestStep).
- "DataSource: Item DataSource" - Takes the response received from the search and turns it into a tabular set of data where each item in the search result is converted into one "row" of data. Also positions the DataSource on the first row, which exposes the columns of the row as standard TestStep properties.
- "PropertyTransfer: Search String" - transfers the values of the current row in the DataSource to the following SOAP Request.
- "Test Request: buy" - submits a "buy" request to our target service with the data transferred from the DataSource as input and validates the response.
- "Groovy Script: showInfoMessage" - displays an interactive dialog to the user running the TestCase on what had been performed in the previous TestStep (i.e. on what was submitted in the buy request).
- "DataSource Loop: Item DataSource" - moves the DataSource in (4) to the next row in the source data and if this was available transfer execution back to the Property Transfer in (5), which will transfer the next rows' values to the request, etc.
- "Test Request: logout" - finally a logout request (once again using the sessionId received in the initial login) that is executed after the DataSource has been exhausted resulting in the preceding DataSource Loop falling through to this TestStep.
This TestCase highlights some of the more advanced possibilities on top of those shown in the first example:
- How to use a DataSource setup to perform Data-Driven testing, in this case pulling the data from the response of preceding request.
- How to use a groovy script to do a simple interaction with the user.
- How to use property-expansions instead of Property Transfers for transferring simple property values between properties and messages.