This page contains information on standalone SoapUI Pro that has been replaced with ReadyAPI.
To use SoapUI reports, feel free to download a ReadyAPI trial from our web site.
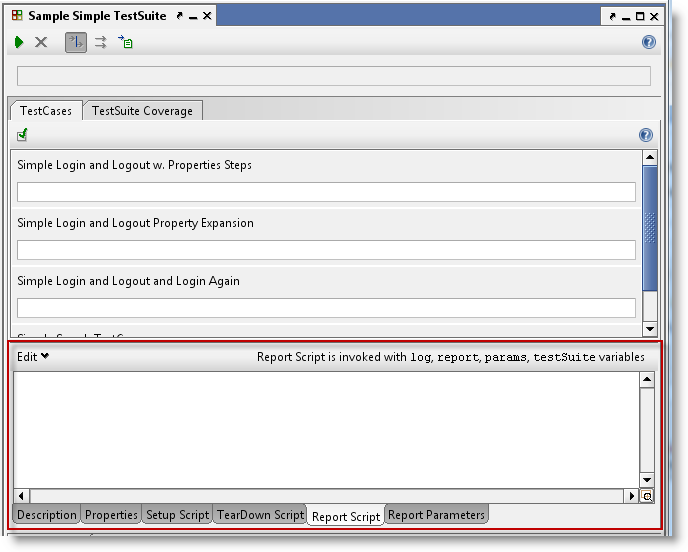
As everywhere else in soapUI, you can use scripting to extend the default reporting functionality to your specific needs. For reporting there is a Report Script available at all levels where you can generate reports; Project, TestSuite, TestCase and LoadTest. The script editor is available next to the standard tabs in each window, for example here in the TestSuite window:
The script is run each time a report is generated and has extensive possibilities to add content dynamically to the report. The following objects are available in the script:
- log - the standard log4j logger. It logs to the script log at the bottom of the soapUI window.
- report - the underlying report object that holds all data used to populate the report. Use this to add data or modify data or subreport data which will be used to fill the report template.
- params - a map holding all defined report parameters and their values, allowing you to set or change these as desired.
- testSuite - the modelItem object at the current level (this will be project, TestCase, etc... at the other levels)
The report and params objects are the main objects you can use for manipulating the report data. Let's have a look at them to see what we can do.
1. Objects for Customization of Report
The params Object
The params objects is a standard StringToObjectMap holding values for all defined report parameters, including both those defined in the report template to be filled and those defined in the Report Parameters tab. Set a parameter value with:
params.<parametername> = <value>
For example in our customization document we defined a "ReportTitle" parameter, in our script we can programmatically add the current date to the title:

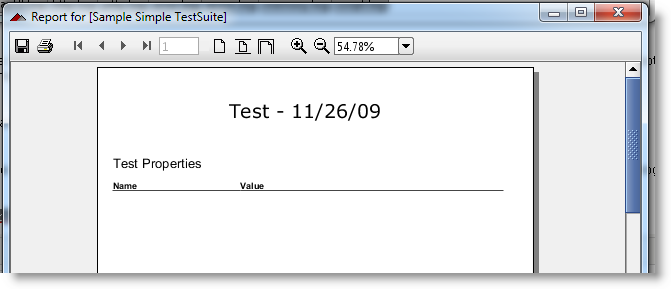
and the generated report now contains:
The report object
The report object has two main usages:
- adding metrics to be displayed in the metrics portion of the report
- adding/modifying subreport data
Let's have a quick look at each of these in turn.
2. Adding Metrics to a report
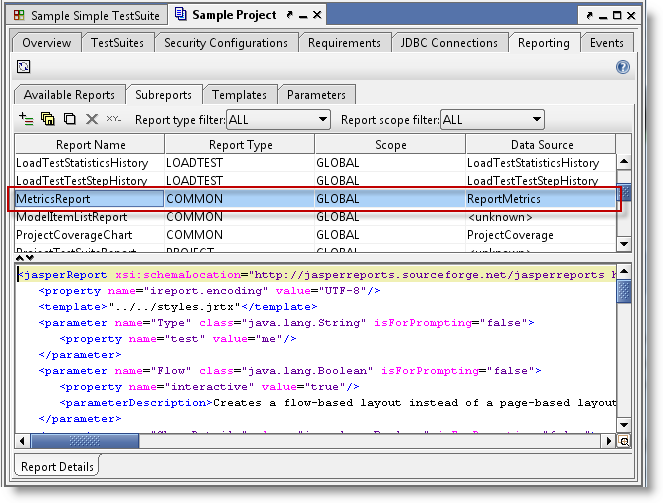
Each default report included with soapUI contains a metrics section that shows execution related metrics rendered by the MetricsReport SubReport template:
Metrics are grouped into categories and can have an optional Icon displayed to their left. Adding metrics is straightforward:
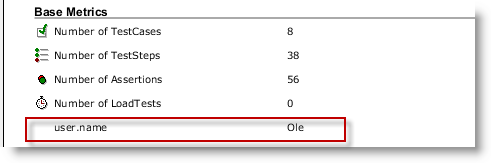
report.addMetric( "user.name", System.getProperty( "user.name" ))
Add a user.name metric to the Base Metrics category and thus render in the main reports as:
If we want to put them under our own category; let's do:
report.addMetric( "System Properties", "user.name", System.getProperty( "user.name" ), null )
which gives us:

Hmm... why not add all of them? The script is:
for( name in System.properties.propertyNames() )
{
   report.addMetric( "System Properties", name, System.getProperty( name ), null )
}
and the result:
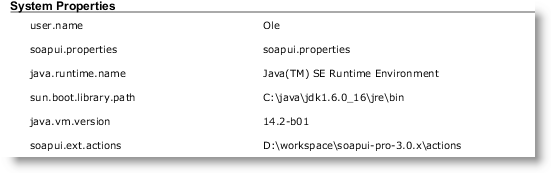
(and on it went for another 5 pages...)
3. Working with SubReport data
Subreports in this context are the data that is exposed for subreport templates; they are automatically added as Jasper Report Parameters and passed to subreports via the standard DataSourceExpression syntax. You can access existing subreports but also add new ones, which can consequently be used to fill subreports. Let's create a custom SubReport for the above System Properties and a corresponding template to use for rendering. To achieve this we need to do the following:
- Create a SubReport class that exposes the data to be filled into the report and add it to the report in the Report Script
- Create a Subreport template that renders the System Properties data
- Modify a main report to include this subreport
- Add an interactive configuration property to allow the user to select if the System Properties should be added to the report
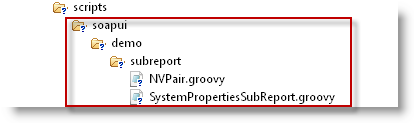
Instead of putting all groovy code in the Report Script, we will put the actual SubReport class in the script library folder; create a soapui\demo\subreport folder under the soapui-pro\bin\scripts folder and add two files; SystemProperiesSubReport.groovy and NVPair.groovy:
Here is SystemPropertiesSubReport.groovy:
package soapui.demo.subreport
import com.eviware.soapui.reporting.reports.support.AbstractJasperSubReport;
import net.sf.jasperreports.engine.data.JRBeanCollectionDataSource
public class SystemPropertiesSubReport extends AbstractJasperSubReport{
	public SystemPropertiesSubReport( def modelItem )   {
		super( modelItem, "SystemProperties", false );
	}

	public JRBeanCollectionDataSource buildDataSource( def modelItem )  {
		List props = new ArrayList();
		for( name in System.properties.propertyNames() ) {
			props.add( new NVPair( name, System.getProperty( name )))
		}
		return new JRBeanCollectionDataSource(props);
	}
}
And here is the helper NVPair.groovy:
package soapui.demo.subreport

class NVPair {
	String name
	String value
	public NVPair( String n, String v ) {
		name = n
		value = v
	}
	public getName()    {
		return name
	}
	public getValue()   {
		return value
	}
}
The Subreport class returns a JRDataSource object containing a list of name-value pairs, one for each system property. In the Report Script for our TestSuite we now add:
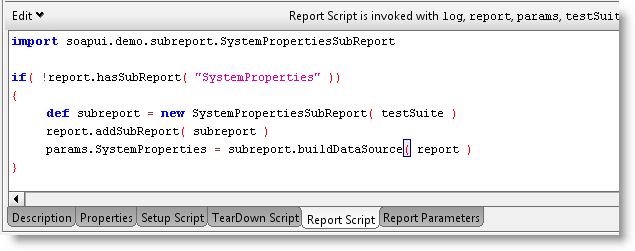
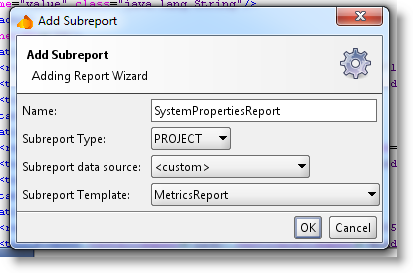
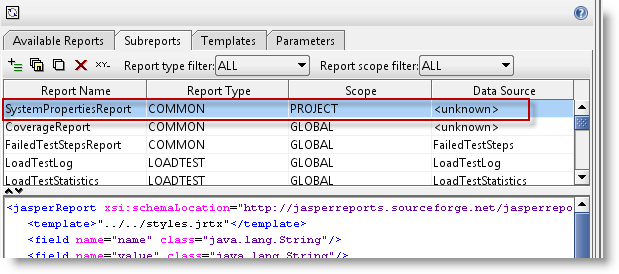
Here you can see that the script adds the Subreport to the report class if it hasn't been done earlier. Your next step is to create the subreport template. Open the Reporting tab in your project and add a subreport named "SystemPropertiesReport":
Select any existing template and replace it with the following content:
<jasperreport bottommargin="0" columnwidth="535" language="groovy" leftmargin="0" name="report name"
pageheight="842" pagewidth="535" rightmargin="0" topmargin="0"
xmlns="http://jasperreports.sourceforge.net/jasperreports"
xmlns:xsi="http://www.w3.org/2001/XMLSchema-instance"
xsi:schemalocation="http://jasperreports.sourceforge.net/jasperreports
http://jasperreports.sourceforge.net/xsd/jasperreport.xsd">
    <field class="java.lang.String" name="name">
       <field class="java.lang.String" name="value">
          <columnheader>
             <band height="59">
                <statictext>
                   <reportelement height="20" style="ColumnHeader" width="122" x="0" y="35">
                      <textelement textalignment="Left" verticalalignment="Middle">
                         <text>Name</text>
                      </textelement>
                   </reportelement>
                </statictext>
                <statictext>
                   <reportelement height="20" style="ColumnHeader" width="40" x="133" y="35">
                      <textelement textalignment="Left" verticalalignment="Middle">
                         <text>Value</text>
                      </textelement>
                   </reportelement>
                </statictext>
                <statictext>
                   <reportelement height="34" style="SmallHeader" width="535" x="0" y="0">
                      <textelement textalignment="Left" verticalalignment="Middle">
                         <text>System Properties</text>
                      </textelement>
                   </reportelement>
                </statictext>
             </band>
          </columnheader>
          <detail>
             <band height="21">
                <textfield>
                   <reportelement height="20" width="122" x="0" y="1">
                      <textelement textalignment="Left" verticalalignment="Top">
                         <textfieldexpression class="java.lang.String">$F{name}</textfieldexpression>
                      </textelement>
                   </reportelement>
                </textfield>
                <textfield>
                   <reportelement height="20" width="350" x="133" y="1">
                      <textelement textalignment="Left" verticalalignment="Top">
                         <textfieldexpression class="java.lang.String">$F{value}</textfieldexpression>
                      </textelement>
                   </reportelement>
                </textfield>
             </band>
          </detail>
       </field>
    </field>
</jasperreport>
In the Reporting tab this will be:
Next is to add this to an existing main report, let's continue with the Custom Properties report we created previously and add the following:
<jasperreport bottommargin="30" columnwidth="555" leftmargin="20" name="ReportTemplate"
pageheight="842" pagewidth="595" rightmargin="20" topmargin="30"
xmlns="http://jasperreports.sourceforge.net/jasperreports"
xmlns:xsi="http://www.w3.org/2001/XMLSchema-instance"
xsi:schemalocation="http://jasperreports.sourceforge.net/jasperreports
http://jasperreports.sourceforge.net/xsd/jasperreport.xsd"\>
<property name="ireport.encoding" value="UTF-8">
<parameter class="java.lang.String" name="ReportTitle">
<property name="interactive" value="true">
<property name="label" value="Report Title">
<parameterdescription>Sets the title in the Report</parameterdescription>
<defaultvalueexpression>"Default Title"</defaultvalueexpression>
</property>
</property>
</parameter>
<parameter class="net.sf.jasperreports.engine.JRDataSource" isforprompting="false" name="SystemProperties">
<detail>
<band height="122">
<subreport isusingcache="true">
<reportelement height="30" isprintrepeatedvalues="false" positiontype="Float" width="500" x="0" y="0">
<subreportparameter name="Type">
<subreportparameterexpression>"Test"</subreportparameterexpression>
</subreportparameter>
<datasourceexpression>$P{TestProperties}</datasourceexpression>
<subreportexpression>"subreport:PropertiesReport"</subreportexpression>
</reportelement>
</subreport>
<subreport isusingcache="true">
<reportelement height="30" isprintrepeatedvalues="false" positiontype="Float" width="500" x="0" y="50">
<subreportparameter name="Type">
<subreportparameterexpression>"Test"</subreportparameterexpression>
</subreportparameter>
<datasourceexpression>$P{SystemProperties}</datasourceexpression>
<subreportexpression>"subreport:SystemPropertiesReport"</subreportexpression>
</reportelement>
</subreport>
</band>
</detail>
</parameter>
</property>
</jasperreport>
Here you can see that:
- Line 11 defines a parameter for the SystemProperties subreport datasource
- Lines 28 to 35 add the actual SubReport
So now when we generate the report at Test Suite level. We get:

Almost done! Now, let's add a Configuration Parameter to the report template that allows the user to select if the System Properties subreport should be created. Back in the main report template we add the following under the parameters section:
<parameter class="java.lang.Boolean" name="IncludeSystemProperties">
  <property name="interactive" value="true">
    <property name="label" value="Include System Properties">
      <parameterdescription>Includes System Properties in Report</parameterdescription>
      <defaultvalueexpression>true</defaultvalueexpression>
    </property>
  </property>
</parameter>
and add the following condition to the corresponding subreport:
<reportelement height="30" isprintrepeatedvalues="false" positiontype="Float" width="500" x="0" y="50">
  <printwhenexpression>$P{IncludeSystemProperties}</printwhenexpression>
</reportelement>
Now when we select to create the report we get a checkbox which controls if the System Properties should be added or not:

That's it! The above should give you a hint on the available customization possibilities, your project budget sets the limit :-)