NOTE: This page contains information on standalone SoapUI Pro that has been replaced with ReadyAPI.
To try enhanced security testing functionality, feel free to download a ReadyAPI trial from our website.
In this document we will have a look at how soapUI Security Tests are structured, configured, executed and analyzed.
1. What is a Security Test?
A Security Test is used in soapUI to scan your target services for common security vulnerabilities, like for example SQL Injections and XML Bombs. Security Tests are layered “on top” of an existing TestCase to which it then applies a configurable number of “Security Scans” which perform the actual vulnerability scanning and detection.
In the main navigator Security Tests are visible under a corresponding “Security Tests” node under the containing TestCase:

You can add as many Security Tests to a TestCase as desired, either via the “New SecurityTest” action in the TestCase right-click popup menu, or via the corresponding TestCase window toolbar button. Either way, you will be presented with a wizard the assists you in creating a default configuration to get started with:
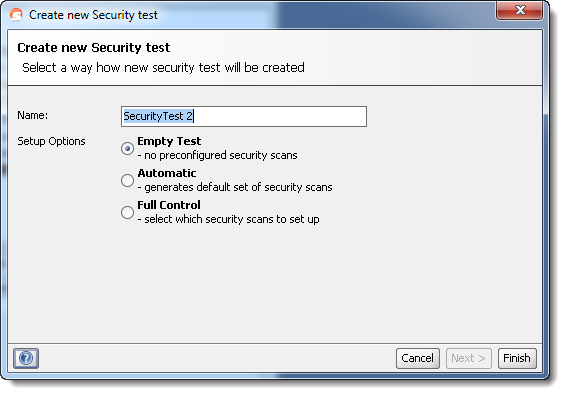
- “Empty Test” will simply create an empty Security Test, requiring you to manually configure the desired Security Scans.
- “Automatic” will generate a default setup with common Security Scans and default assertions
- “Full Control” will give you fine-grained control of which Security Scans to add and how they should be configured initially
Once added, double-click a Security Test to see its main configuration and execution window:
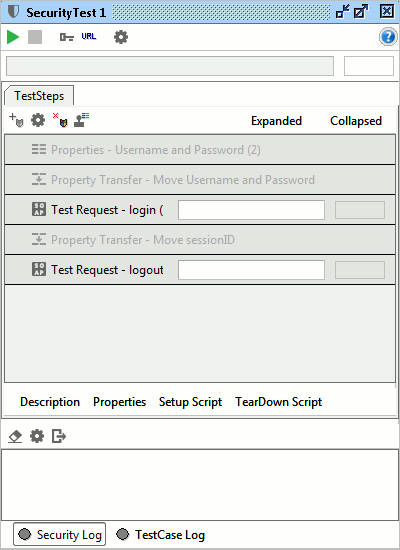
This window has a layout similar to the TestCase window (top to bottom);
- A toolbar with actions related to execution, reports, etc
- A progress-bar at the top for tracking progress of the Security Test as it executes
- A toolbar and list of the TestSteps in the underlying TestCase, with additional information on execution progress and configured Security Scans for each TestStep
- The usual inspectors for adding a description, properties and setup/teardown scripts to the Security Test
- a number of log tabs for viewing results from the execution of the Security Test
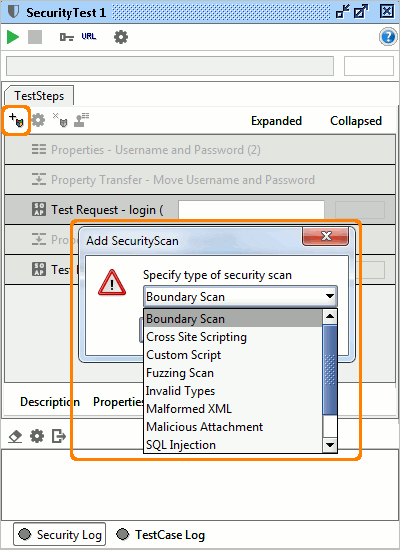
Use either the toolbar on top of the list of TestSteps or the TestStep popup menu to add Security Scans to a TestStep;
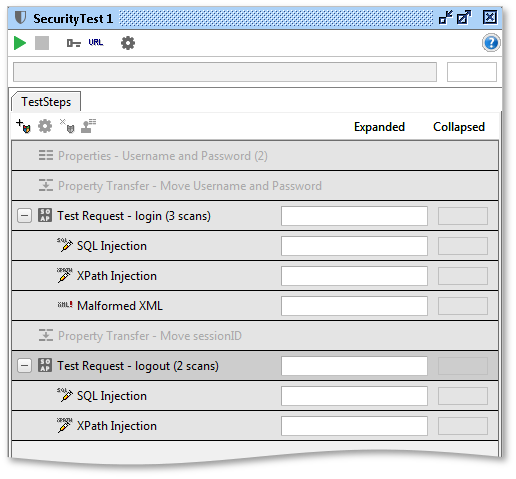
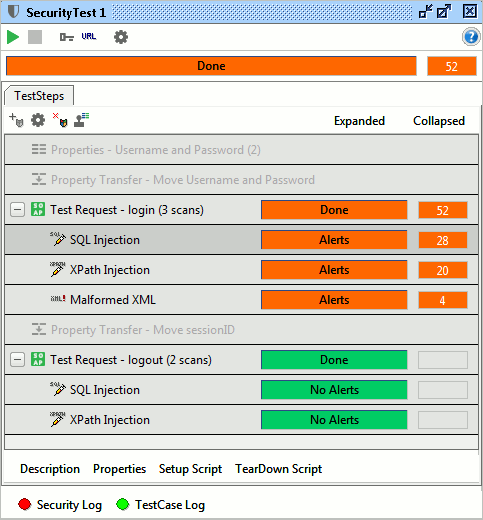
Once added, the Security Scans are visible under the corresponding TestStep, for example in the following setup we have added three scans to the first login request and 2 scans to the following logout:
(Read more about the available Security Scans and how they are configured)
2. Execution
As already mentioned, a Security Test provides its actual security testing by adding an arbitrary number of Security Scans to each of the Request TestSteps in the underlying TestCase. When running the SecurityTest, these scans are applied to the underlying TestStep, scanning the target service for security vulnerabilities and reporting the results in the Security Test window and logs.
To run a Security Test, make sure all your scans are configured as desired and press the run button in the top left. The following will now happen:
- Each TestStep in the underlying TestCase will be executed and asserted as usual – the results of the functional test are visible in the “TestCase Log” at the bottom of the Security Test window
- For each TestStep, its configured Security Scans will be executed also (before moving on to the next TestStep). Their individual progress and results will be shown in the Security Test window and the Security Run Log at the bottom of the Security Test window
So if you have a Security Test for a TestCase with three TestSteps and corresponding Security Scans;
- A login request
- SQL Injection Scan
- XPath Injection Scan
- Malformed XML
- A property transfer of the session id from the login response to the logout request
- A logout request
- SQL Injection Scan
- XPath Injection Scan
The execution order would be
- Run the login request
- Run the login SQL Injection Scan using the login request as a template
- Run the login XPath Injection Scan using the login request as a template
- Run the login Malformed XML Scan using the login request as a template
- Run the Property Transfer
- Run the logout Request
- Run the logout SQL Injection Scan using the logout request as a template
- Run the logout XPath Injection Scan using the logout request as a template
In the Security Test window, this would perhaps look as follows:
Here you can see the following
- The overall progress of the Security Test and the number of alerts raised by the Security Scans
- The progress and number of alerts for each TestStep and Security Scan as it executes
- Detailed information from the Security Test and Scans as they execute in the Security Log
- The Functional TestCase log as would be available in the TestCase window if we had just run the underlying TestCase there
3. Understanding Results
Now that you have run the Security Test, it’s time to have a look at the Security Log to see what actually happened. In my case, I had configured the log to show all requests, but you can use its options dialog to only show Security Scan requests that raised an alert.
Clicking on Security Scan in the Security Test window will automatically move the log to the corresponding entry in the log, so if I for example click the first SQL Injection Scan, I will see
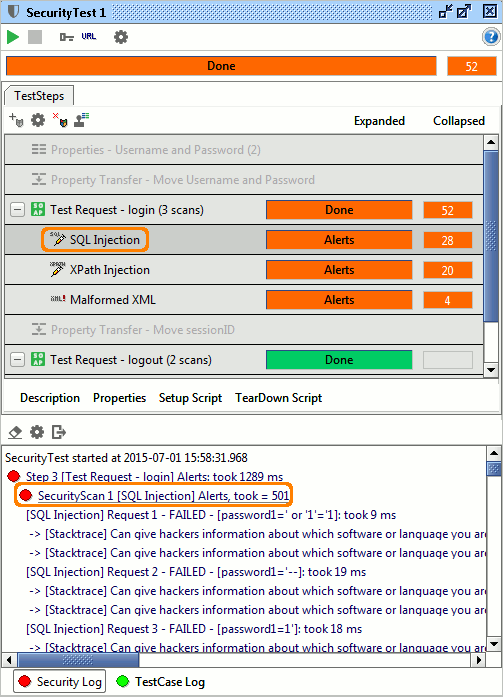
Requests that contain “FAILED” were identified by the Security Scan to not behave in a secure way, in my case this is mostly due to the fact the response contained a stack-trace that can give hackers an insight into which software the server is using (for further exploits).
If we click the second SQL Injection scan we see:
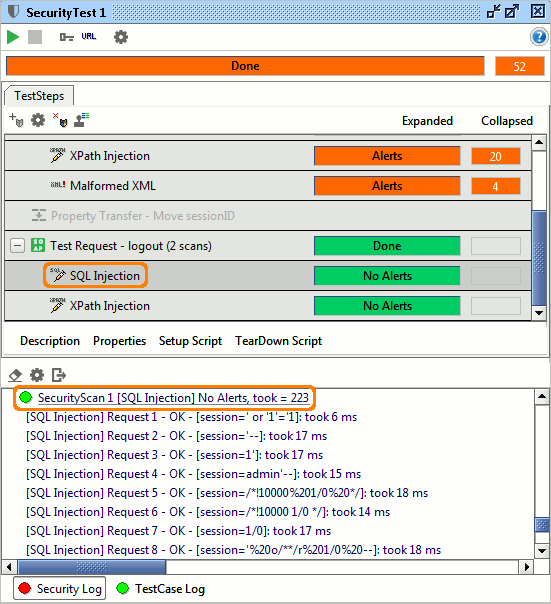
Here no alerts were raised, so it seems our logout implementation is not open for either SQL or XPath Injection attacks. Phew!
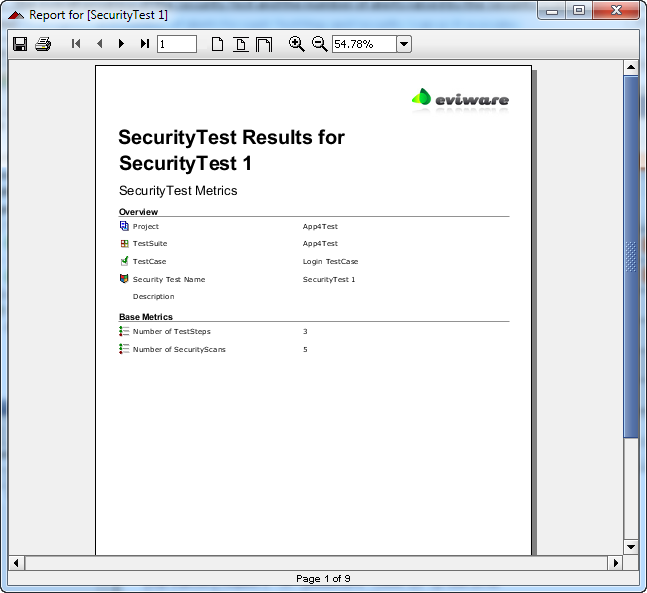
This log can of course be turned into a report as well, press the usual “Create Report” button in the top Security Window toolbar, which will prompt you to generate a printable report which is then generated for preview:
4. Wrap-up
That’s it, now read on about Security Scans or get straight to making sure your services are as bullet-proof as you want them to be!