NOTE: This page contains information on standalone ReadyAPI that has been replaced with ReadyAPI.
To try the new functionality, feel free to download a ReadyAPI trial from our website.
Although the default flow of a TestCase is to execute the defined TestSteps sequentially after each other, there are many scenarios in which you might want to loop or branch depending on the outcome of some previous TestStep. There are several ways to accomplish this in soapUI;
- By using the Conditional Goto TestStep
- By creating a Script TestStep that does this for you
- By using a DataSource Loop Step - this is closely tied to the DataSource TestStep and is covered in the section on DataDriven Testing
Let's have a look at the first two in detail and then have a quick look at the Delay TestStep which allows you to insert an arbitrary delay in the execution of your TestCase.
1. TestSteps for flow control
The Conditional Goto TestStep
The Conditional Goto TestStep holds an arbitrary number of XPath expressions each together with a corresponding target TestStep. These are applied to the nearest Response of a previous Sampler TestStep; the configured XPath expressions are applied top-to-bottom and when an XPath expression evaluates to true the Conditional Goto will transfer execution to the specified TestStep.
Adding and opening a Conditional Goto TestStep shows the following editor:

This is rather straight-forward; the list to the top-left contains the defined conditions (empty for now, the editor to the right allows editing of conditions after they have been created, and the log at the bottom helps us test around a bit. Lets dive right in; select the Add button to the top left and Enter some name;

Press OK and then select the XPath wizard in the bottom right (only in the Pro version, be sure to have a response available), this allows us to select the node we want to check;

Here the nearest previous Sampler TestStep was a JDBC Request, we can see the generated XML presented in a tree view allowing us to easily select the node we want to use for our condition. After selecting it and pressing OK we get the following:

The generated XPath is hightlighted on the top, at the bottom we now have to choose to which step the TestCase should jump if the XPath expression evaluates to true (which it doesn't for now, we need to surround the above generated XPath with an exists( ... ) clause to check for the existence of the specified element).
Now if we run the Conditional Goto with the top toolbar button we get:

The log shows that our condition was successfully triggered.
Now we can add more conditions with different conditions and branching, allowing us to route TestCase execution as desired.
Branching and Looping with a Script TestStep
The Script TestStep gives you fine-grained possibilities to control the flow of your TestCase, allowing you to jump to any desired TestStep in your TestCase, or alternatively just to execute that TestStep without actually moving execution to it (the Script TestStep is covered in more detail here, lets just have a look at some examples to give you the general idea). The two methods in use are
testRunner.gotoStepByName( "nameofteststep" )
This method transfers control to the specified TestStep after the script has finished (not instantly!). So for example the following script that randomly selects between two target steps:
if( Math.random() > 0.5 )
   testRunner.gotoStepByName( "Request 1")
else
   testRunner.gotoStepByName( "Request 2")

// do something else
....
would jump to the specified TestStep first after the code coming after the randomization has been executed.
The other method available is
testRunner.runTestStepByName( "nameofteststep" )
which does just what the name implies; it actually executes the specified TestStep. Changing the above script to use this method instead
if( Math.random() > 0.5 )
   testRunner.runTestStepByName( "Request 1")
else
   testRunner.runTestStepByName( "Request 2")

// do something else
....
This would run the specified TestStep before moving on. Surrounding this in a loop as follows:
// run ten random requests
for( i in 1..10 )
{
   if( Math.random() > 0.5 )
      testRunner.runTestStepByName( "Request 1")
   else
      testRunner.runTestStepByName( "Request 2")
}

// do something else
....
would run ten random requests before executing the remaining script. Here the use of gotoTestStepByName(...) would have no effect, it would result in the same as the first example.
Delay TestStep
The Delay TestStep does just what it sounds like; it delays the execution of the TestCase by the specified number of milliseconds. Create a Delay TestStep from the top menu as usual:
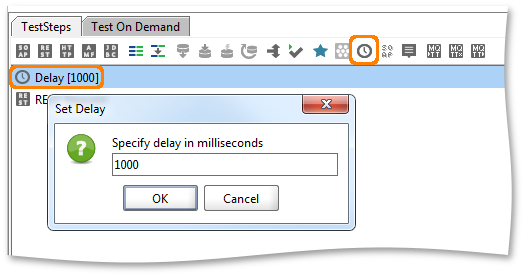
In the list of TestSteps the label shows the name of the Delay TestStep and its value, which will count down while it is being executed.
Double-click the TestStep to open the above prompt which allows you to set the delay, either to a fixed value or by standard property-expansions. For example the following value would delay the TestCase between 5 and 10 seconds:
${=5000 + 5000*Math.random()}