Properties are a central aspect of more advanced testing with soapUI. For an overview, see Scripting and Properties > Working with Properties
In regard to Functional Testing properties are used to parameterize the execution and functionality of your tests, for example:
- Properties can be used to hold the endpoints of your services, making it easy to change the actual endpoints used during test execution (see example below).
- Properties can be used to hold authentication credentials, making it easy to manage these in a central place or external file.
- Properties can be used to transfer and share session ids during test execution, so multiple teststeps or testcases can share the same sessions.
- etc.
Lets start at looking some of the basics before we dive into an example.
1. Defining Properties
Custom can be defined at several levels in soapUI:
- At the Project, TestSuite and TestCase level in the corresponding Properties tab (see below).
- In a Properties TestStep (see below).
- In a DataGen TestStep (read more).
- As part of a TestStep configuration:
- Within a DataSource TestStep (read more) for performing Data-Driven Testing scenarios.
- Within a DataSink TestStep (read more) for saving property values to external storage.
Furthermore, most other TestSteps expose properties for both reading and writing, for example:
- the Script TestStep exposes a "Result" property containing the string value returned by the last executed script.
- all Request TestSteps expose a Response property containing the last received response.
Properties can easily be both read and written from scripts and also transferred between TestSteps with the Property-Transfer TestStep (read more).
Project, TestSuite and TestCase Properties
Properties can be defined at any of these three levels in the corresponding properties inspector, for example at the project level:
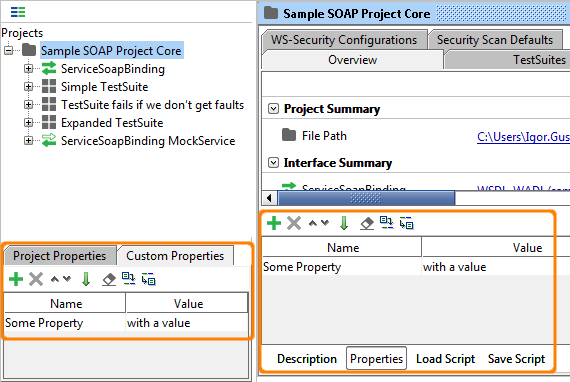
Here you can see the defined "Some Property" property both in the Properties tab in the Overview tab of the Project window (to the right), and in the Custom Properties tab for the project node in the Navigator to the left. Corresponding tabs are available for TestSuites and TestCases and all can be used to add/remove/change the contained properties.
Defining properties at these levels allows them to easily be accessed from scripts (see below) and via property expansion (see below), for example a global password might be stored at the project level and accessed inside a request message with a standard property expansion: ${#Project#Password}.
A flexible mechanism for overriding any properties defined at these levels from the command-line is described here.
2. The Properties TestStep
The Properties TestStep is used for defining custom properties to be used within a TestCase. Its main advantages over defining properties at the TestCase level are:
- You can organize properties into multiple Properties TestSteps (if you have many of them).
- You can specify source and target filenames which will be used to read and write the contained properties when the TestStep is executed.
The Properties TestStep Window is as follows:
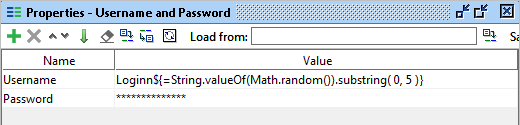
Here you can see two defined properties which are read from the specified login.txt file on execution of the TestStep.
3. Script access to properties
Reading and Writing property values from a script is straight-forward, to get a property value you first need to get hold of the containing object and then use the getPropertyValue(..) method. For example to get a TestSuite property from within a Script TestStep you would do the following:
// get username property from TestSuite
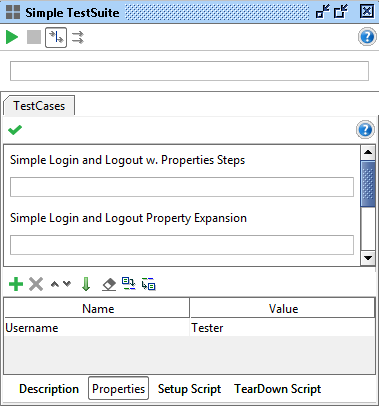
def username = testRunner.testCase.testSuite.getPropertyValue( "Username" )
The property had been defined in the TestSuite window as follows:
And to write this value to (for example) a HTTP Request Parameter property you would do
// write the username to the HTTP Request
testRunner.testCase.testSteps["HTTP Request"].setPropertyValue( "Username", username )
(please note that this example could have been achieved much more easily with a Property-Transfer TestStep).
4. Example - Centralized Endpoint
A common scenario in a more complex service environment is the need to change the endpoint of some of the services involved in your tests, for example between test, dev and staging environments. Manually changing endpoints is of course possible but far too tedious when there might be hundreds of request teststeps involved, and using the command-line host override option does not allow you to change a single service endpoint if you have multiple ones in use. Properties to the rescue;
- Define a project property holding the endpoint:
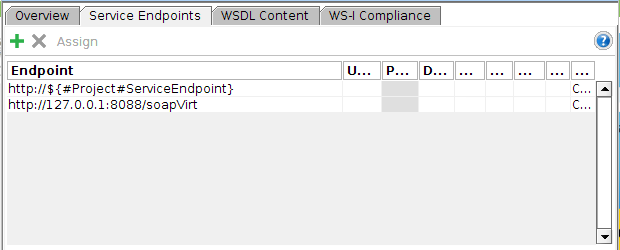
- Configure the endpoint to use this property via property-expansion:
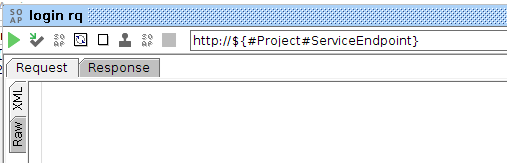
- Make sure your requests are using the configured endpoint:
- Now when you run the request, the property will automatically be replaced with its current value. To use a different value just change the endpoint in the UI, or from the command-line you can use the -P option;
-PServiceEndoint=dev.smartbear.com:8884
which would use the dev.smartbear.com:8884 endpoint instead.
No one knows APIs better than SmartBear. Find out what our Pro version of SoapUI can do to improve your testing.