Working with Projects
In SoapUI your work is organized into projects, which are displayed under the root node in the workspace navigator. A project can contain any number of functional tests, load tests and service simulations required for your testing purposes.
Projects can either be open or closed (via their right button menu). We recommend that you close unused projects in order to use less memory and increase SoapUI startup speed.
Add a new project to your workspace either by importing an existing one or by creating a new one, either using the workspace popup or File menu.
Creating and saving projects
SoapUI allows you to create a project in several ways.
- Create a SOAP-based project
- Create a project with a REST service from a URL
- Create a “Generic project”
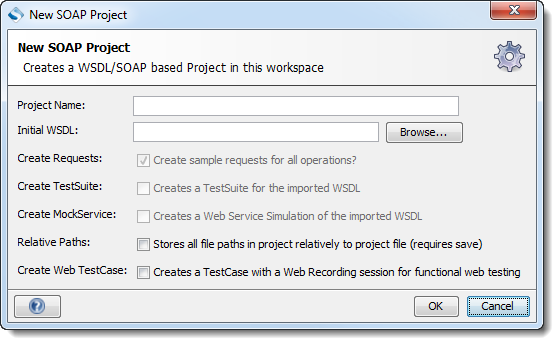
When you choose to create a SOAP-based project, the following dialog will be shown. Fill in the name and specify an initial WSDL file to import, set desired settings and select OK. SoapUI will then generate the service and, optionally, a test suite and a mock service.
 \
\
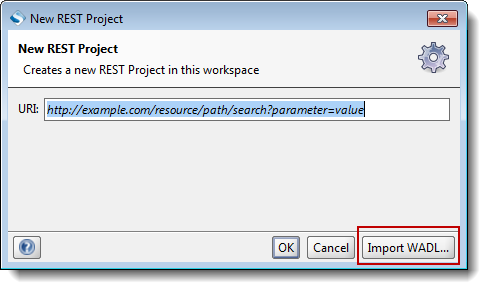
To create a project with a REST service, you just need to input a URL in the dialog below. SoapUI will generate the REST service for you, but you will have to add a test suite to it manually. To learn more about the new REST functionality in 4.6 see this page.
 \
\
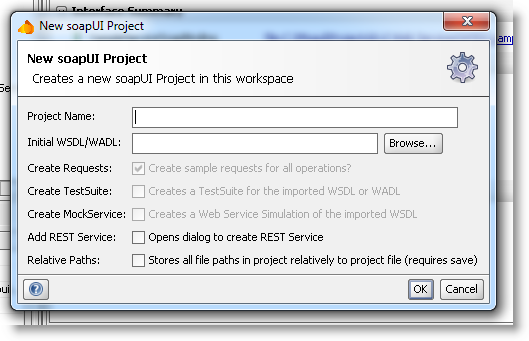
Finally, a Generic project is an “old school” SoapUI Project – the dialog below is the same as in earlier versions of SoapUI – which will allow you to generate both SOAP- and REST-based service entries on creation.
\
When exiting SoapUI, you will be prompted to save any new projects that have not yet been saved; previously saved projects will automatically be saved on exit (unless you select the “Exit without saving” option from the File menu).
Projects are by default saved into one singe xml-file which contains all project artifacts (interfaces, tests, MockServices, scripts, etc.). If the project contains no external file references, its project file can easily be passed around, checked into a version control system, etc. If the project does contain references to external resource, this will need to be included with the project and preferably referred to using the “Resource Root” functionality described below.
An auto-save feature is available via the global Preferences UI Settings tab:
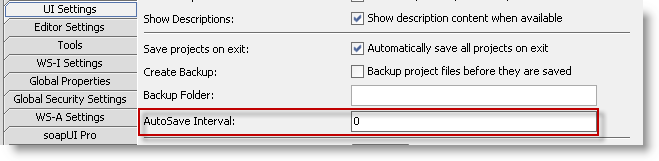
Specify the autosave interval in minutes, which will then automatically save all open projects as configured.
Importing and Resolving projects
If you already have an existing project file you can easily import it into your workspace by selecting the “Import Project” option from the workspace popup menu which will prompt you for the project file and add it to the workspace. After imported, SoapUI does a check of the project to see that it is consistent and has all necessary external dependencies available (a process called “resolving”). If errors are found a Resolve dialog is displayed showing you all errors and giving you options to resolve them as required:
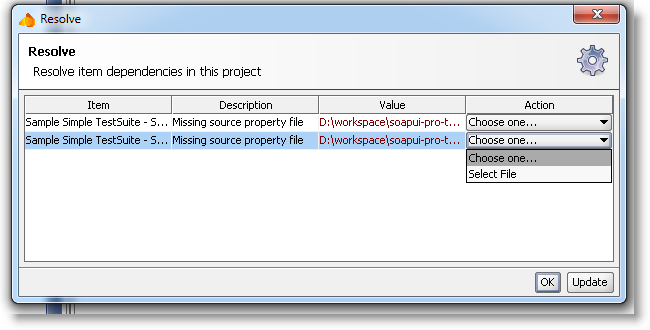
In this example two property files specified in separate TestSteps are missing, the action drop-down for each allows you to select the correct file.
When you are content with the selected (or ignored) resolution(s), press the OK button to start working with the project.
Tip: If you manually want to do a checkup on your project, you can manually select the “Resolve” option from the project popup menu, which will start the above procedure if any errors are found.
Remote Projects
SoapUI allows you to import projects over the http protocol, which makes it easy to publish projects (tutorials, demonstrations, bug-reports, etc) on a website which can subsequently be imported into anyone’s workspace. Select the “Import Remote Project” option from the workspace popup and specify the URL to the project file; SoapUI will load and import the project just as if it were a regular local projects.
Since it is not possible to save the project file back to the URL, any changes will have to be saved to a local copy upon exit.
The Project Window and Overview
The project window is opened by double-clicking the project node in the navigator; it contains a number of tabs with project-scoped settings and data:
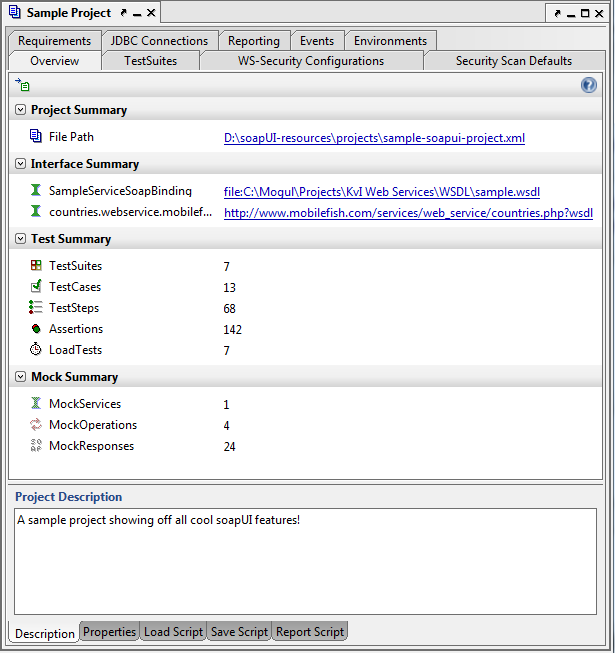
The Overview tab shown above gives some general data on the contained project and allows the specification of a project description, project-level properties and several event scripts that can be used to enrich your project;
- Load Script – Called after the project has been loaded. This can be used to for example initiate some session specific data, endpoints, etc
- Save Script – Called before the project is being saved, allowing you to perform custom cleanup tasks, for example removing passwords or test items, etc.
- Report Script – called when generating a Project Report as described at …
The other tabs are related to specific functionalities in SoapUI and will be covered elsewhere:
- TestSuites – shows all functional TestSuites in the Project (see http://www.soapui.org/Functional-Testing/structuring-and-running-tests)
- Security Configurations – manages project-level WS-Security configurations for SOAP-bases Web Service (see http://www.soapui.org/SOAP-and-WSDL/applying-ws-security)
- Requirements – manages project requirements (see http://www.soapui.org/Working-with-Projects/managing-requirements)
- JDBC Connections – manages project level JDBC connections that can be used in multiple scenarios (see http://www.soapui.org/Working-with-Projects/jdbc-connections)
- Reporting – manages both global and project-level report templates and parameters (see http://www.soapui.org/Reporting/reporting-infrastructure)
- Events – manages project-level event-handlers that can be used to enhance most aspects of test execution (see http://www.soapui.org/docs/scripting-and-properties/custom-event-handlers/)
- Environments - manages project-level environments for easy switching between different sets of SOAP and REST services, properties and database connections (see http://www.soapui.org/Functional-Testing/environment-handling-in-soapui)
Project resources
It is quite common to use external files for holding properties, test-data, etc. When specifying these it is often desirable to specify the path relative to some other folder instead of as an absolute path, which is made possible by the “Resource Root” property in the bottom left list of properties;
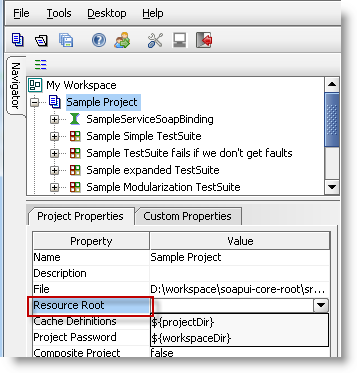
For example, specifying the path “d:\data” here would allow you to specify all remaining paths in your project relative to that folder, for example in an Excel DataSource you could specify just “testdata.xls” which would during execution resolve to “d:\data\testdata.xls”.
Two parameters are available from the configuration drop-down for this property (as shown in the screenshot):
- ${projectDir} – will resolve files relative to the folder containing the project
- ${workspaceDir} – will resolve files relative to the folder containing the workspace file
So for example specifying “${projectDir}/data” would resolve the above mentioned excel file to be in a folder named
Project Encryption
The “Project Password” option in the project properties allows you to easily encrypt the entire contents of the project file;
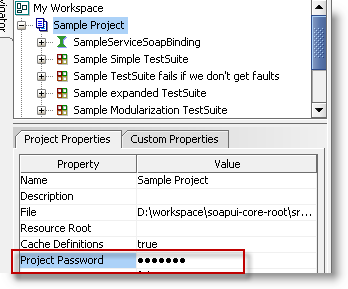
(when saving the project, the project icon will contain a small ‘E’ to indicate it has been encrypted)
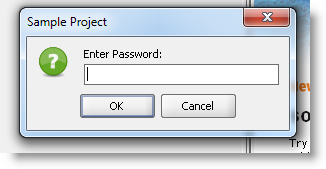
When opening a project that has been saved with a set password, SoapUI will prompt for this to decrypt the project before use.
To remove the encryption just clear the project password and save the project.
Warning! Don’t lose your password; there is no way of recovering an encrypted project file if the password has been lost.